


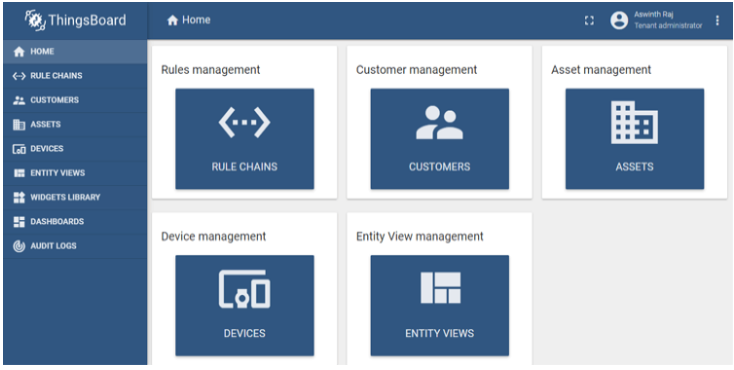
IoT Based Biometric Attendance system
[DESCRIPTION:]
Few years back if you were to tell someone that the Geyser and bedroom lights in your home are connected to internet, they would be baffled and might even criticize it as over-engineered products. But today with the advent of IoT, Smart cities etc the idea no longer sounds strange, we have devices around us that have become smarter by being able to communicate with the internet.
In this project our aim is to leverage this IoT into the boring attendance system to make it smart and more effective. Most conventional attendance systems available today store the information over a micro SD card and have to be connected to software via a computer to access the information. Here, we will build a biometric attendance system using Arduino that scans for finger print and on successful identification of the person it will log the information to a cloud platform like ThingsBoard by using the ESP8266 Wi-Fi module. This information can then be displayed in the dashboard of ThingsBoard making it available for the required authorities to view and analysis information over the internet without having any direct physical access to the hardware. However the conventional Attendance system without involving IoT can also be built by following the link and Finger print sensor can be further used for many other biometric applications like voting machine, Security systemsystem etc.
Preparing your Thingsboard account.
There are many open source cloud platforms available today for your IoT project integrations. Each platform has its own specialty, for our application I was looking for something that is good in data logging and visualization and found Thingsboard.io to suit that purpose
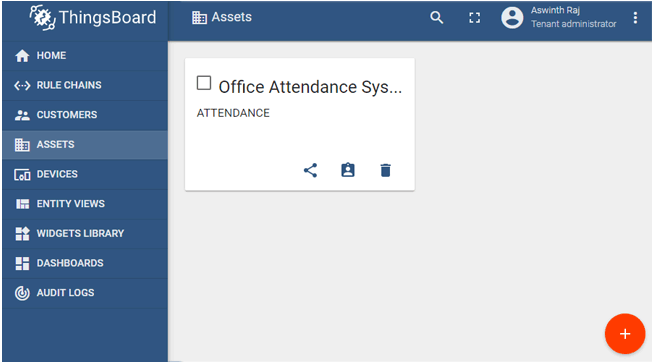
Creating an Asset on Thingsboard
Let’s start by creating our first asset, click on assets on your left panel and you will notice all the assets related to your account, you might have none or some example assets which you can ignore. To create an asset click on the add icon on the bottom right corner of the screen which creates a pop-up promoting for Name, Asset type and Description. You can give any name and type .Once the details are entered just click on Add and your asset will be created. Note that I have named by asset as , remember this for we will need it later. Once the asset is created you can notice it appearing on the window as shown below.
Preparing the ESP8266-01
The ESP8266 should be operated both in AT command mode and Programming mode for this project. We can use aLM317 to regulate 3.3V for powering the ESP8266 module and connect the Tx Rx pins to FTDI board as shown below.

The toggle switch can be used to toggle the ESP8266 between AT command mode and Programming mode and a push button can be pressed to reset the module. Note that the ESP8266 has to be reset every time before a code is being uploaded to it. If you are confused on how to do it you can refer to the basics of ESP8266, including how to use ESP8266 in AT command mode and Flash firmware on it.
This circuit will only be used to upload the program to ESP8266, later we will replace the FTDI board with Arduino UNO in our final set-up.
Program
Adding the required libraries and providing the Wi-Fi credential and password with the Token value that we obtained earlier. Then create a Wi-Fi client that connects to the Thingsboard demo page. The code for the same is shown below.
#include <PubSubClient.h> //http://pubsubclient.knolleary.net/
#include <ESP8266WiFi.h> //https://github.com/bportaluri/WiFiEsp
#define WIFI_AP "CircuitLoop"
#define WIFI_PASSWORD "pasword14785"
#define TOKEN "IFhm5ggJVsEpokiIoQ"
char thingsboardServer[] = "demo.thingsboard.io";
WiFiClient wifiClient;
Inside the setup function, we will begin the serial communication at a 9600 baud rate and initialize the Wi-Fi module to connect to the Wi-Fi router. Finally, we will connect our Wi-Fi client to the ThingsBoard server.
void setup()
{
Serial.begin(9600);
delay(10);
InitWiFi();
client.setServer( thingsboardServer, 1883 );
lastSend = 0;
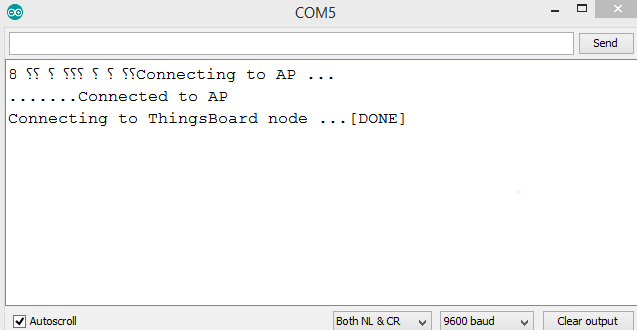
}Testing ESP8266 connection with ThingsBoard
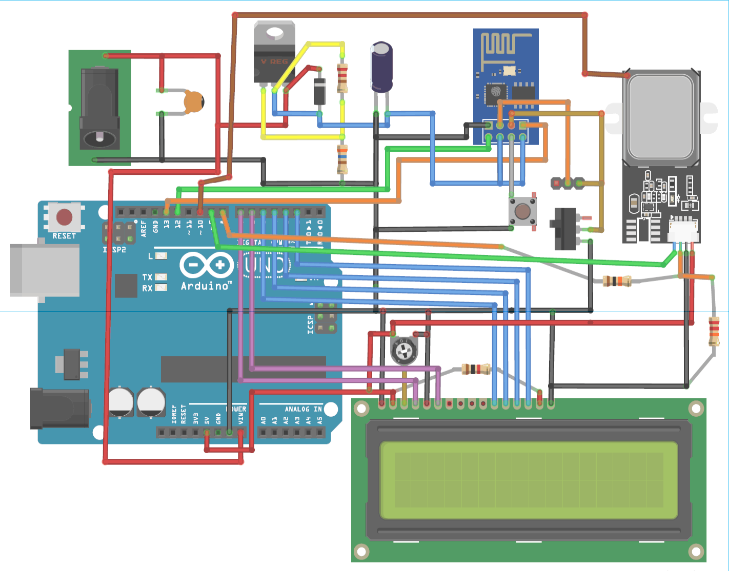
Circuit diagram for IoT based Attendance System
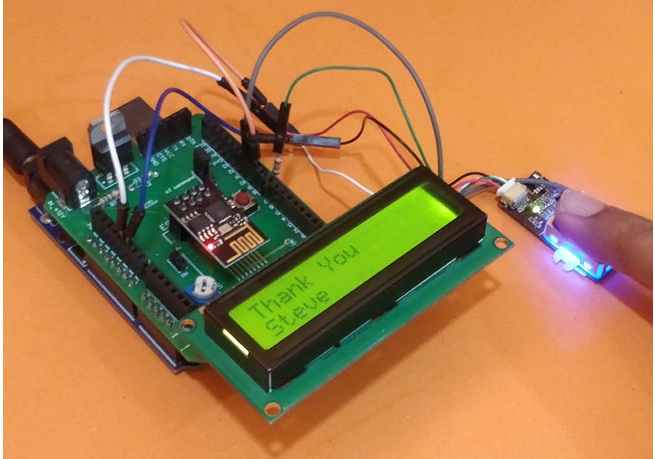
Testing the complete IoT based Arduino Attendance System
Sample output:
UPGRADE:
In our system, we can upgrade Smart Facial attendance and thermal sensing system to for biometric attendance and store personal information about a person
Code for Arduino


/*
 * Arduino with GT511C2 FingerPrint Sensor (FPS)
 * Code to enroll and Detect Fingers
 * For: www.circuitdigest.com
 * Dated: 6-5-19
 * Code By: Aswinth
 *
 * Connect Tx of FPS to Arduino Pin D4 and Rx of FPS to D5
 */

char *Name_List[]= {"ADMIN", "Mahesh", "Aswinth", "Munna", "Pankaj", "Sandeep", "Ashok", "Gust 1", "Gust 2", "Gust 3", "Gust 4"};

#include "FPS_GT511C3.h" //Get library from
#include "SoftwareSerial.h" //Software serial library
#include <LiquidCrystal.h> //Library for LCD
#include "OnePinCapSense.h" //Librarey to sensor capacitive touch
SoftwareSerial ESP(12, 13); // RX, TX

FPS_GT511C3 fps(9, 8); //FPS connected to D9 and D8

const int rs = 7, en = 6, d4 = 5, d5 = 4, d6 = 3, d7 = 2; //Mention the pin number for LCD connection
LiquidCrystal lcd(rs, en, d4, d5, d6, d7);//Initialize LCD method

int capSensePin10  = 10; //Pin to which casing of sensor is connected
int id = 200;
OnePinCapSense opcs = OnePinCapSense();

void setup()
{
  Serial.begin(9600);
  ESP.begin (9600);

  lcd.begin(16, 2); //Initialise 16*2 LCD
  lcd.print("GT511C3 FPS"); //Intro Message line 1
  lcd.setCursor(0, 1);
  lcd.print("with Arduino"); //Intro Message line 2
  delay(2000);
  lcd.clear();

  fps.Open();         //send serial command to initialize fps
  fps.SetLED(false);   //turn on LED so fps can see fingerprint
}

void loop()
{

 int capSense10 = opcs.readCapacitivePin(capSensePin10) ;
 if( capSense10 < 100)
 { fps.SetLED(true); delay(500);}
 Serial.println(capSense10);

// Identify fingerprint test
  if (fps.IsPressFinger())
  {
    fps.CaptureFinger(false);
    id = fps.Identify1_N();
      lcd.clear();
      if (id==200)
      {
      lcd.print("Unkown"); lcd.setCursor(0,1); lcd.print("Try Again!!");//If not recognised
      }
      else if (id==0)
      {
       lcd.print("Welcome"); lcd.setCursor(0,1); lcd.print("***ADMIN***");//If not recognised
       delay(2000);
       Enroll();
      }
      else
      {
        lcd.print("Thank You"); lcd.setCursor(0,1); lcd.print(Name_List[id]); ESP.println(Name_List[id]);
        Serial.println("Sent Value to ESP");
      }

      delay(1000);
      fps.SetLED(false);
  }
  else
  {
    fps.SetLED(false);
    lcd.clear();
    lcd.print("CircuitDigest"); //Display intro text
    lcd.setCursor(0,1);
    lcd.print("Press Finger");
  }
}

void Enroll() //Enrol function from library exmaple program
{
  int enrollid = 0;
  bool usedid = true;
  while (usedid == true)
  {
    usedid = fps.CheckEnrolled(enrollid);
    if (usedid==true) enrollid++;
  }
  fps.EnrollStart(enrollid);

  // enroll
  lcd.clear();
  lcd.print("Enroll #");
  lcd.print(enrollid);
  while(fps.IsPressFinger() == false) delay(100);
  bool bret = fps.CaptureFinger(true);
  int iret = 0;
  if (bret != false)
  {
    lcd.clear();
    lcd.print("Remove finger");
    fps.Enroll1();
    while(fps.IsPressFinger() == true) delay(100);
    lcd.clear(); lcd.print("Press again");
    while(fps.IsPressFinger() == false) delay(100);
    bret = fps.CaptureFinger(true);
    if (bret != false)
    {
      lcd.clear(); lcd.print("Remove finger");
      fps.Enroll2();
      while(fps.IsPressFinger() == true) delay(100);
      lcd.clear(); lcd.print("Press yet again");
      while(fps.IsPressFinger() == false) delay(100);
      bret = fps.CaptureFinger(true);
      if (bret != false)
      {
        lcd.clear(); lcd.print("Remove finger");
        iret = fps.Enroll3();
        if (iret == 0)
        {
          lcd.clear(); lcd.print("Enrolling Success");
        }
        else
        {
          lcd.clear();
          lcd.print("Enroll Failed:");
          lcd.print(iret);
        }
      }
      else lcd.print("Failed 1");
    }
    else lcd.print("Failed 2");
  }
  else lcd.print("Failed 3");
}

Code for ESP8266

/*Program to connect ESP8266 to thingsboard and sent the value received through serial input
 * For IoT Attendance Project
 * Author: B.Aswinth Raj
 * Dated: 11-5-2019
 * Website: www.circuitdigest.com
 */
#include <PubSubClient.h> //http://pubsubclient.knolleary.net/
#include <ESP8266WiFi.h> //https://github.com/bportaluri/WiFiEsp

#define WIFI_AP "CircuitLoop"
#define WIFI_PASSWORD "circuitdigest101"

#define TOKEN "lrmsUz2M4cA9wN3dVmUX"

char thingsboardServer[] = "demo.thingsboard.io";
WiFiClient wifiClient;

PubSubClient client(wifiClient);

int status = WL_IDLE_STATUS;
unsigned long lastSend;

void setup()
{
  Serial.begin(9600);
  delay(10);
  InitWiFi();
  client.setServer( thingsboardServer, 1883 );
  lastSend = 0;
}

String Name ="";

void loop()
{
  if ( !client.connected() ) {
    reconnect();
  }

  if ( Serial.available() ) { // Update and send only after 1 seconds
    char a = Serial.read();
    Name = Name + String(a);
    if (a == 13) //check for new line
    {
    Name.trim(); //Remove /n or /r from the incomind data
    Serial.println(Name);
    Send_to_Thingsboard();
    Name =""; //clear the string if new line is detected
    }
  }

  client.loop();
}

void Send_to_Thingsboard()
{
  Serial.println("Collecting temperature data.");

  String Employee_Name = Name;

  // Prepare a JSON payload string
  String payload = "{";
  payload += "\"Name\":"; payload += Employee_Name;
  payload += "}";

  // Send payload
  char attributes[100];
  payload.toCharArray( attributes, 100 );
  client.publish( "v1/devices/me/telemetry", attributes );
  Serial.println( attributes );

}

void InitWiFi()
{
  Serial.println("Connecting to AP ...");
  // attempt to connect to WiFi network

  WiFi.begin(WIFI_AP, WIFI_PASSWORD);
  while (WiFi.status() != WL_CONNECTED) {
    delay(500);
    Serial.print(".");
  }
  Serial.println("Connected to AP");
}

void reconnect() {
  // Loop until we're reconnected
  while (!client.connected()) {
    status = WiFi.status();
    if ( status != WL_CONNECTED) {
      WiFi.begin(WIFI_AP, WIFI_PASSWORD);
      while (WiFi.status() != WL_CONNECTED) {
        delay(500);
        Serial.print(".");
      }
      Serial.println("Connected to AP");
    }
    Serial.print("Connecting to ThingsBoard node ...");
    // Attempt to connect (clientId, username, password)
    if ( client.connect("ESP8266 Device", TOKEN, NULL) ) {
      Serial.println( "[DONE]" );
    } else {
      Serial.print( "[FAILED] [ rc = " );
      Serial.print( client.state() );
      Serial.println( " : retrying in 5 seconds]" );
      // Wait 5 seconds before retrying
      delay( 5000 );
    }
  }
}