
CODE GUIDE FOR DROWSYNESS DETECTION SYSTEM IN RASBERRY PI
Important note: Please download the .dat(model for this project) file from below link
https://drive.google.com/file/d/1b7wGQASBSBjgHyasqLOEpUtCxa3ikwrp/view?usp=drivesdk
In this document I will give the information about what is drowsiness detection system, Which components are used for this system, what is the use of component in the system, How to Setup the Raspberry Pi for this Project. What is environment in python and How to make environment for any project, Which library/software you have to install and How it can be installed, How the project is working, How to run this project in the raspberry pi system.
First, what is drowsiness detection system?
- As its name suggest this detects the drowsiness of the person with help of continuously tracking eyes of the person with the help of camera.
- System does not only detects the drowsiness it sends the email on registered number in system and sends the message to register number in the system.
- The purpose of sending message and email is that another related person can get the information about the drowsiness of the driver and they can call or contact the driver to alert him about his drowsiness.
Which components are used for this system?
- As given below components are used in this project
- Raspberry pi board
- Memory card
- Camera
- Buzzer
- Transistor “BC 547”
What are the use of components in this system?
- In This system we have used Raspberry pi board which needs memory card with flashed operating system; In this system for tracking the eyes of the driver we are using camera; Buzzer with BC547 transistor it is used to alert the driver
Installation and set up process of raspberry pi
initial hardware requirements
This installation process can be done with TWO different set of Hardwares.
- With Full set up
- Raspberry pi
- HDMI cable
- Power supply
- Monitor
- Keyboard
- Mouse
- Sd card
- Sd card reader/holder
2. Headless set up
- Personal computer
- Raspberry Pi
- Power supply
- Sd card
- Sd card reader/holder
Note: How to Setup a Raspberry Pi Without a Monitor or Keyboard
Initial software requirements
You need to download 2 software and 1 O.S.(Operating System). (Latest O.S. according Raspberry Pi model is recommended)
1st software: The first software is Win32 Disk Imager.
https://sourceforge.net/projects/win32diskimager/
or
1st software: Raspberry pi imager
(Note: if you are using this there is no need of downloading O.S. from another source you have to ignore third link.)
2nd software: Second software is SD Card Formatter.
https://www.sdcard.org/downloads/formatter_4/
Raspbian OS: This is the Main operating system of the Pi.
https://www.raspberrypi.org/downloads/raspbian/
Before further procedure, don't forget to check the SD card requirements.
Installation
With rasberry pi imager
Step 1: Launch SD card formatter
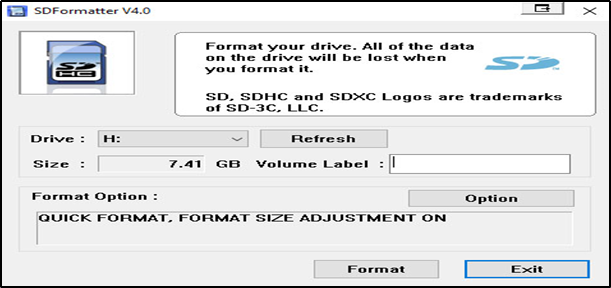
Launch the SD Formatter. Click the Option button and change the Format Size Adjustment to ON. Leave the Volume Label blank. The volume label for the SD card will take on the name from the image. Click the Format button. Take care to select the correct Drive (don’t format the wrong drive!).
Step 2 — Download and Install Raspberry Pi Imager
The first step is to download the Raspberry Pi Imager from the official Raspberry Pi website. This tool will allow you to choose an OS, have it downloaded automatically, and write it to the SD card of your choice.Do not download files from third-party websites as they may be malicious. Only use trusted sources.
.png)
.png)
The imager tool is available on Windows, macOS, and Ubuntu. Images shown will be from a Mac, but the tool will work the same across the supported platforms.
Step 3: Choose OS
Several operating systems are available for selection within the Raspberry Pi Imager, but we will focus on Raspberry Pi OS.
There are 3 versions of Raspberry Pi OS available. We will briefly touch on each one but we will be using Raspberry Pi OS (32-bit) for this guide.
Raspberry Pi OS (32-bit) Lite: This version provides the bare essentials to get you up and running. There is no Graphical User Interface (GUI) with this image and the size is around 0.4 GB.
Raspberry Pi OS (32-bit): This version includes a GUI and has basic software installed. The size of this image is around 1.1 GB.Raspberry Pi OS Full (32-bit)
.png)
Step 4: Choose SD Card
You’ll now need your SD card connected to your computer to copy over the OS you chose.
.png)
Select WRITE
.png)
You’re now ready to begin writing the OS to your SD card.
Step 5: Write to SD Card
This step will write the selected OS to the SD card and run a verification that the copy was successful.
.png)
The writing process will vary depending on the OS you selected. Typically, this will only take a few minutes
.png)
The verify process only takes about a minute to complete.
The OS has now been copied to your SD card. You are now ready to move on to booting your Raspberry Pi.
With Win32disk
Step1: Unzip the .zip files
Here You need to unzip .zip downloads to get the (.img) to write to your SD card.
Note: The Raspberry Pi OS with desktop image contained in the ZIP archive is over 4GB in size and uses the ZIP64 format. To uncompress the archive, a unzip tool that supports ZIP64 is required. The following zip tools support ZIP64:
- 7-Zip (Windows)
- The Unarchiver (Mac)
- Unzip (Linux)
Step 2: Launch SD card formatter
Click the Option button and change the Format Size Adjustment to ON. Leave the Volume Label blank. The volume label for the SD card will take on the name from the image. Click the Format button. Take care to select the correct Drive (don’t format the wrong drive!).

Step3: Launch Win32Disk Imager
Launch the Win 32 Disk Imager. Enter the path to your downloaded (unzipped) image. From the Device dropdown, select the device with the SD card (again take care to select correct drive). Click the Write button to begin the transfer. This will take a while
.png)
Step 4: Eject safely
Once complete, open Windows Explorer, and find the SD card drive. Right click on the drive, then select Eject. Or, you can click on the Windows notification area (lower right for most installations), then Safely Remove Hardware and Eject Media icon. Click the Eject Removable Disk for the SD card drive.
Full Set up
Booting Your Raspberry Pi
Insert your microSDHC card into your Raspberry Pi. Then, hook up your Raspberry Pi to power, keyboard, mouse, and monitor.
You should be brought directly into the Raspberry Pi OS with a Welcome to Raspberry Pi dialog on the display.
We’ll step through this quick setup and then you will be on your way!
.png)
“Select Next”
.png)
“Choose Your Country”
“Choose Your Language”“Choose Your Timezone”
Select the checkboxes if you are using the English language and an English keyboard
The next screen will prompt you to change your password. The default username is “pi” and the default password is “raspberry”
It is best practice to enable strong passwords for your accounts.
Enter a new password
.png)
Confirm the new password
Figure 15:Set up screen
.png)
The next screen will ask you if there is a black border around the desktop. The desktop should take up the entire screen. If it doesn’t, Raspberry Pi OS can make the adjustment to fill the black space. This change will take effect when the Raspberry Pi is restarted.
Select the checkbox if the screen shows a black border around the desktop.
Press Next
The next screen will prompt you to connect the Raspberry Pi to a wireless network. If no internet connection is available you can press the skip button to proceed past this step. If you have a wired connection you will not see this step.
Select a Wireless Network
.png)
.png)
Press Next
The next screen will prompt you to enter the wireless network password. You can uncheck “hide characters” to see the characters you are typing.
Enter Wireless Network Password
The next screen will ask you if you’d like to have the operating system and applications checked and updated if necessary. An internet connection is required to complete this step. Press “Skip” if you’d like to continue without checking.
Note: The time to complete this step will vary based on your internet connection and specs of your Raspberry Pi.
.png)
Press Next
A popup will indicate when your system is up to date.
.png)
The last screen will let you know that setup is complete and your Raspberry Pi is good to go. Feel free to restart your Raspberry Pi for any system changes to take effect.
.png)
1. creating environment
To create a Python Virtual Environment:
- Open Terminal / BASH
- Install virtual environment libarary (sudo pip install virtualenv)
- Create a folder for your project (mkdir folder name)
- Navigate to the project folder (cd folder_name)
- Create the virtual environment (python3 -m venv ./venv)
- Activate the virtual environment (source ./venv/bin/activate)
.png)
Figure 21: Raspberry pi terminal/bash
It only takes a few commands to create a virtual environment
As the above screen shot shows, it only takes a few commands to create and activate the virtual environment. The ls command is just to show that the folder was empty and the final line (with the venv prefix) shows that the virtual environment is activated.
There are a few commands that can be used to double check that a virtual environment is now in use:
.png)
New Python Virtual Environment
- which python – displays where Python is running from
- which pip3 – displays where Pip is running from
- pip list – displays the modules/libraries installed by pip, in a new virtual environment this should be minimal.
The virtual environment can be turned off using the deactivate command.
1. installing the libraries for this project
Which are the required libraries/softwares for this projects?
- The required library and software you have to install before making any move in the code is as given below with version and notes.
Libraries:
- “SciPy” version-1.6.2
- “TensorFlow” version-1.15.0
- “imutils” version-0.5.4
- “dlib” version -19.22.0(before installing dlib you must install “Cmake” and “visual studio”)
- “OpenCV-python” version-4.5.1.48
This was the main outside library which you have to install but there is also many libraries which comes with python itself. In folder which you downloaded there is a file naming “requirement.txt” you have to check that for python’s library and its version. You have to install that version library to run the project smoothly.
Libraries can be installed in two ways
- One by one
- All at a time
- One by One
.png)
First for installing library you have to activate the virtual environment which will install library in only environment these libraries will not available outside virtual environment
To download library one by one you can use the below command in the command line:
python -m pip install <libaray_name>==library_version
Example: python -m pip install OpenCV-python==4.5.1.48
.png)
- All at once
If you want to install library all at once then follow below step:
- You must go at address in command line where you have downloaded/unzipped the folder
- Then write below command at that place:
pip install -r requirement.txt
.png)
2. walkthrough the code
In the folder which you have downloaded there is a python script file naming “Drowsiness_Detection.py" which is our main script file you open with any python ide or editor.
This code can be divided in to 2 parts:
- Importing libraries and initializing function and variables
.png)
.png)
.png)
.png)
.png)
3. running the code
You can run this script in terminal or any python ide.
- To run this script in terminal
- Open the terminal
- As instructed above activate the Virtual environment
- Then reach at the address of the python script and run fileby the help of following command:
python “file name.py”
or
python Drowsyness_Detection.py
.png)
This python script will automatically open your webcam and will give live video streaming.
- Running on any python IDE.
In any python ide you can run this script in simple steps.
According to your IDE you have click on the run button or you have to run the command.
IMPORTANT NOTE: I have uploaded this description with more graphical represtation in the miscellaneous files so please refer for easy graphical representation