A) Project Overview
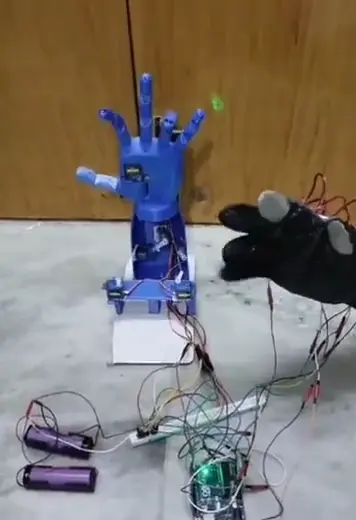
The Low-Cost Prosthetic Arm project focuses on creating an affordable and functional prosthetic limb for individuals with upper limb amputations. By utilizing flux sensors and servo motors, the project aims to deliver a cost-effective solution that provides essential movements and capabilities, enhancing the quality of life for users who might not have access to high-end prosthetics.
B) Ease of Use: Create an intuitive control system using flux sensors that respond to muscle movements, making the prosthetic arm easy to operate.
Key Components
D) Flex Sensors: These sensors detect the magnetic flux changes caused by muscle contractions. When a muscle contracts, it generates a small electrical signal that the flux sensor can detect and translate into movement commands for the prosthetic arm.
E) Servo Motors: Servo motors are used to drive the movements of the prosthetic arm. They provide precise control over the position and speed of the arm's joints, enabling smooth and accurate movements.
F) Microcontroller: A microcontroller processes the signals from the flux sensors and sends appropriate commands to the servo motors. It acts as the brain of the prosthetic arm, coordinating all its functions.
G) Power Supply: A lightweight, portable power source, such as a rechargeable battery, powers the prosthetic arm, ensuring that it remains operational throughout the day.
Design and Development
H) Sensor Integration: Flux sensors are placed on the user's residual limb to detect muscle contractions. These sensors are calibrated to accurately interpret the user's intentions and translate them into specific movements.
I) Motor Control: The servo motors are strategically positioned in the prosthetic arm to replicate the natural movement of the human arm. They are connected to the microcontroller, which sends signals based on input from the flux sensors.
J) Prosthetic Structure: The arm is constructed using lightweight, durable materials to ensure comfort and longevity. The design focuses on ergonomics, ensuring a snug fit that mimics the natural arm as closely as possible.
K) User Interface: The system is designed to be user-friendly, with a simple interface for calibration and adjustment. Users can fine-tune the sensitivity of the flux sensors and the responsiveness of the servo motors to suit their preferences.
L) Benefits
Cost-Effective: By using readily available and affordable components, the prosthetic arm can be produced at a fraction of the cost of traditional prosthetics.
Improved Accessibility: The lower cost makes advanced prosthetic technology accessible to a larger population, particularly in low-income regions.
Enhanced Independence: Users can perform daily tasks more independently and with greater ease, improving their overall quality of life.
M) Future Development
Advanced Control Systems: Exploring more sophisticated control mechanisms, such as machine learning algorithms, to enhance the arm's responsiveness and adaptability.
Customization: Developing modular components that allow users to customize the prosthetic arm to their specific needs and preferences.
Integration with Other Technologies: Incorporating additional sensors or connectivity features, such as Bluetooth, to expand the arm's functionality and interaction with other devices.
This project represents a significant step towards making prosthetic technology more inclusive and affordable, ultimately empowering individuals with limb loss to lead more active and independent lives.

.png)

.png)
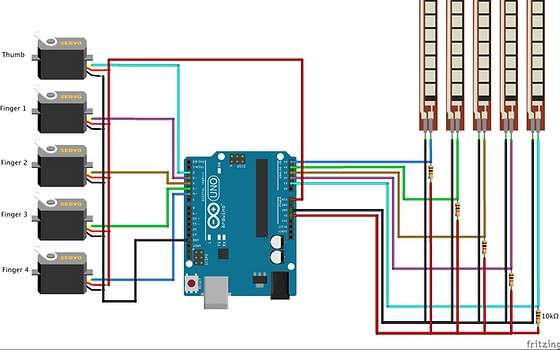
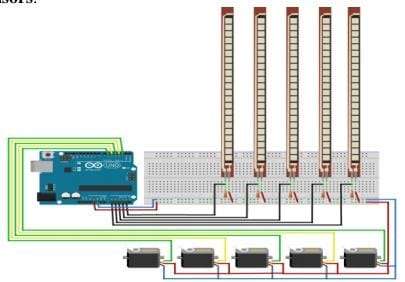
CIRCUIT DIAGRAM

Flex sensors are connected to analog pins of Arduino Uno as we are sending analog pulses to Uno.
The negative pin from the flex sensor is connected to the negative rail of the breadboard and the positive to the positive rail on a breadboard via a resistor, whereas we get a signal pin from the resistor end attached to the positive terminal (upper side) and these give us deflect signals from the sensor and are connect from A0 to A4
There are 5 flex sensors used in this project that control the movement of each servo horn.

All five servo motors have been given connections to PWM Pins (Pulse Width Modulation). These pins act as
potentiometers and hence provide varying voltage. This is done because servo motors need variable voltage for their working. All 5 flex sensors have been connected to the five analog pins. The servo motors must be connected to a lithium-polymer battery so that it works properly.
The final flow of circuitry
Circuitry of the Robot
Powering the components
Powering the Servo motor
Brown to the negative supply
Red to positive Supply
Orange to signal (PWM pin)
Connecting the Flex sensor
Flat part to 5V
Stripped part to Analog input A0 pin.
Stripped part to the ground using a resistor.
PROJECT BUDGET
| COMPONENTS | PRICE |
| Prosthetic arm | ₹2500 |
| Gloves | ₹354 |
| Flex sensor(5) | ₹1750 |
| Servo motor(5) | ₹600 |
| PCB board | ₹60 |
| Jumper wire | ₹150 |
| TOTAL AMOUNT | ₹5,414 |
VIDEO
