Overview:
The project discusses about building a robot for monitoring remote areas that sends data back to a control centre, with the additional ability to stream the data to any device by using a Flask server coded in Python Language.
The main system consists of 2 parts:
- The Remote Monitoring Unit- This includes the Robot Chassis which is deployed in a far region such as in mines, borders, prisons etc to monitor the conditions. It houses the raspberry pi, camera and gas sensor.
- The Control Unit - This includes a set of systems which will continuously monitor the data sent from the Robotic Chassis, and give commands either through voice or text.
The Robot is capable of understanding commands like Forward, Stop, Reverse, Left, and Right. The system is divided into 3 main software parts, the MQTT connection, Image Processing algorithms using OpenCV and Flask Server setup.
Hardware Setup:
The Hardware part consists of the Robot Chassis, the motor driver module (L293D), DC motors, Raspberry Pi and sensors like PiCamera and a MQ-7 gas sensor.
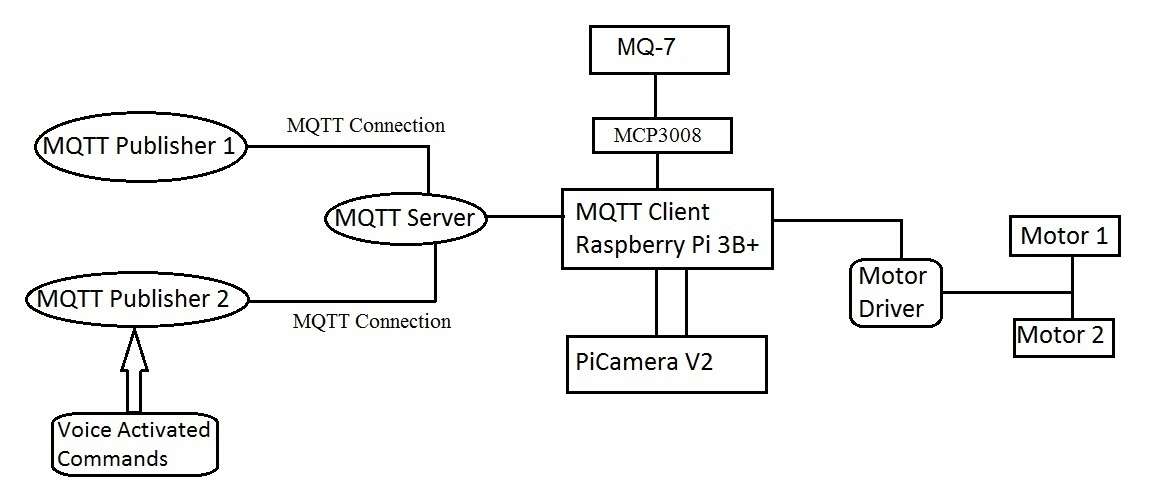
The robot is assembled with the hardware components mentioned. The Raspberry Pi is connected to the power bank for supply, the camera directly, and is connected to the DC motors through motor driver. It is also connected to the gas sensor through the MCP3008 ADC, which is connected to the bottom of the chassis. See attached image for connection diagram.
The system operates using an Android application in a smart-phone with Speech-to-Text ability & a computer software called MQTTBox, which are used to transmit the messages to the Raspberry Pi at the Remote Site. The Raspberry Pi controls and coordinates the Robot, that in turn is connected to a PiCamera and a gas sensor, which is used to stream the data back to the control centre. The connection between the Raspberry Pi and control unit is achieved using MQTT (MQ Telemetry Transport). Image Processing techniques like Face Detection & Face Recognition are used which helps in easy surveillance. Additionally, a Flask Server is set up which is used in the fast and seamless stream of video captured by the Robot.
Working Principle:
The commands to be instructed to the monitoring unit are sent either through the MQTT Box, a software for computers, which is the Publisher 1 in the image below, or through the Android Application MQTT Dash with Voice Activation Feature (Voice to text enabled) ,which is Publisher 2. The Command sent is received by the Raspberry Pi via the MQTT Broker, by inputting the correct server address, port number and password at the client and publisher side for the connection. After the commands are received at the client, which is the Raspberry Pi, it is checked with the code to see if the command matched the pre coded functions. If it matches, the function is called with the motors rotating in the coded direction.
The camera and the gas sensor which is connected through the analog to digital converter, are used to convey the information back to the surveillance centre by broadcasting the data via Flask. The control centre can thus stream the robot data and convey commands accordingly.

The MCP3008 ADC is connected to channel 1 of analog pin of the gas sensor. It is then connected to 4 GPIO pins of Raspberry Pi and Vcc and Ground. The digital pin of gas sensor is connected to a GPIO pin, with the Vcc and Ground pins of gas sensor accordingly connected to Raspberry Pi.
A Power Bank is used in the 16 pin motor driver, with 6 GPIO pins connected from Raspberry Pi, including 2 for enable. Python code is written for displaying sensor values and motor movement.
Software Setup:
A. MQTT
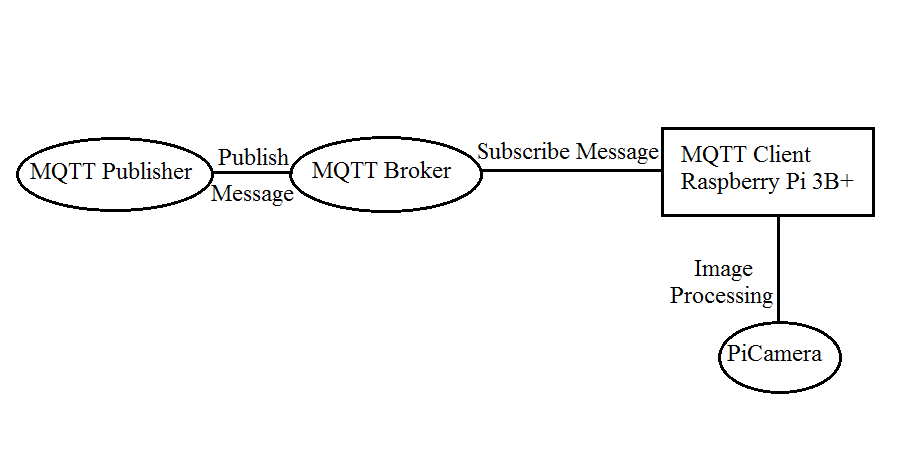
MQ Telemetry Transport (MQTT) is a light-weight messaging protocol mainly for sensors in IOT. The protocol uses a publish/subscribe paradigm, with 3 main parts, the publisher which transmits the command, the MQTT broker or server, which is CloudMQTT, and the client which receives the command to act accordingly.

In this project, 2 clients are used. An android application called MQTT Dashboard with voice activation feature through Google Voice to Text and an application called MQTT Box on a Windows Laptop. Both have the ability to publish messages to the client, which is the Raspberry Pi.
.png)
A MQTT broker is setup using CloudMQTT, which is a server that is setup in the cloud to perform the publish/subscribe message queuing model. In CloudMQTT, we obtain a unique username, password and port number. These information are used in the publisher side and also in the client side python code for establishing the connection through CloudMQTT.
The client, which is the Raspberry Pi, has a python code running continuously which establishes the connection to the MQTT broker through instance name, server address and port number of CloudMQTT broker. After successful connection it accepts any message from the publisher via the broker and if the input command matches a pre coded function, it will run the motors of the robot accordingly to move the vehicle in the desired direction.
B. Android Application
The Android Application used for the MQTT Connection is MQTT Dash. It acts as a MQTT Publisher that transmits the message or command to the robot which acts as the MQTT client. The Android Application is configured with voice activation which lets users to input the commands for the robot using their speech. An Instance name is given with the address of MQTT Broker, to which the client subscribes to, to get the published message in the given Instance directory.
The MQTT Dash requires the Instance name, address of server and port number of server as inputs. The inputs are given accordingly, by verifying the server information.
C. Flask
Flask is a micro web framework written in Python. It is a set of tools and libraries that make web development using Python easier. The Output from the camera is hosted on a webpage put to the cloud in a Flask Server. Using the IP Address of the server running, any user can login and view the outputs of the camera and gas sensors. So, it is also possible for many users to simultaneously view the data of sensors on their mobile phones, Tablets, Laptops or any other gadgets simply by routing to the IP address of the Raspberry Pi Client. Using Flask to stream data from picamera is found here
D. VNC
VNC(Virtual Network Computing) is a graphical desktop sharing system, where we can control and coordinate one computer from another computer running a VNC application. Here, VNC Viewer application has been used to remotely control the Raspberry Pi. The advantage of VNC is that we get a seamless interface with the experience of remotely controlling the Raspberry Pi simply by inputting the IP Address of Raspberry Pi in VNC Viewer Application. Enabling VNC is required during initial boot-up of the Raspberry Pi.
E. OpenCV
OpenCV(Open Source Computer Vision Library) is used for many Computer Vision and Machine Learning Applications. First started at Intel in 1999, it now supports innumerable algorithms which can be easily imported. This project uses OpenCV with Python language, where OpenCV is imported using the line-import cv2. C++, Java and Matlab interfaces are also supported by OpenCV on Windows, Linux and MacOS platforms. OpenCV 4.0 was downloaded and installed on the Raspbian OS of the Raspberry Pi for supporting Face detection and Recognition algorithms.
F. Image Processing Algorithms
Face Detection using Haar Cascades
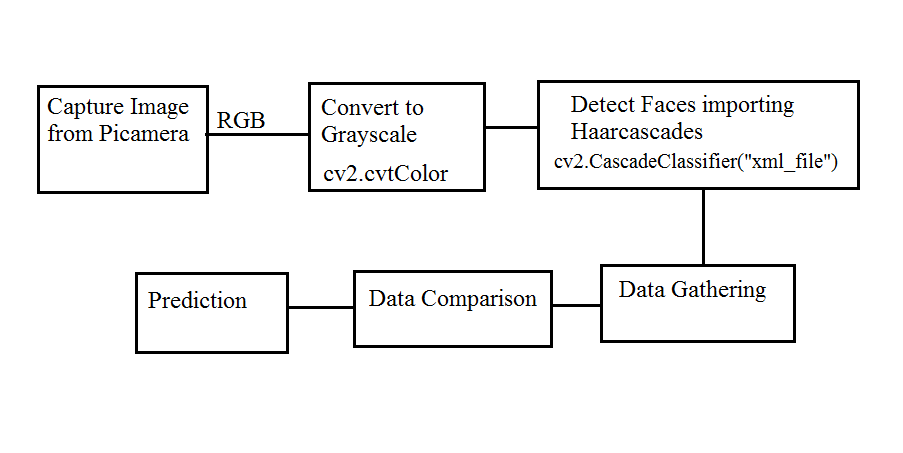
Haar cascade is a classifier that detects specific objects that it has been trained for. Some examples of haarcascades are face detection, eye detection, nose detection, etc. Haar cascades are trained using positive images( images having faces) and negative images( no faces) to learn to correctly classify new images. The Haar classifier is an algorithm trained by many positive and negative images, and widely used in machine learning.
In this project, the pretrained classifier haarcascade_frontalface_default.xml file is used, which is downloaded from OpenCV github repository, to detect faces.
Many operations in OpenCV are done in grey scale for reasons like diminishing the noise in the image, to reduce complexity of code, and increase computing speed to name a few.
The feed from the camera is in the form of pictures at a certain frame rate, as a video is a combination of pictures. So each frame of the video is converted to gray scale using OpenCV.
Face Recognition using LBPH
For recognising faces, detecting it is necessary. After successfully detecting faces, gathering of data is necessary, like the unique characteristics of a specific person’s nose, eyes, mouth. Later, data comparison is done, where the trainer compares all user faces and every individual uniqueness is measured. Finally, face recognition is done, where the given picture is compared with all the pictures of each user and finally outputs the person it thinks is closest to by comparison in the database.

In this project, 3 separate Python codes are written for face recognition. The first code (FaceRecognitionCaptureImageDataset.py) is used to feed the different users photos in the database for future comparison. These photos will be used as reference in the codes to recognize the specific person. The code captures 50 photos of each user, prompting them to enter their user ID. The data base stores 50 photos of each user in separate folders. The more number of photos taken in the dataset, the better the accuracy of recognition, but more memory will be needed.
The second code (Trainer.py) is used to train the data using the inbuilt LBPH class which is cv2.face.createLBPHFaceRecognizer(), with an inbuilt face detection algorithm using Haar Cascade.
The third code (FacRecognizer.py) is used to identify the user by comparing the database with the present input image from the camera. The confidence level of a person belonging to a specific user is calculated, and the user with highest confidence level is considered and given as output for face recognition.
Applications
The surveillance robot is useful in places where humans cannot enter but small robots can. For example, in highly toxic areas, fire situations, and mining areas. The camera feed and gas sensor values can be cross checked for investigation purposes. The robot can be used for surveillance or reconnaissance. It can also be used to detect and recognize faces in a stipulated environment which can be further implemented for worker based attendance system using the concept of facial recognition. Face detection and recognition feature also makes the surveillance of areas straight forward.
Results:
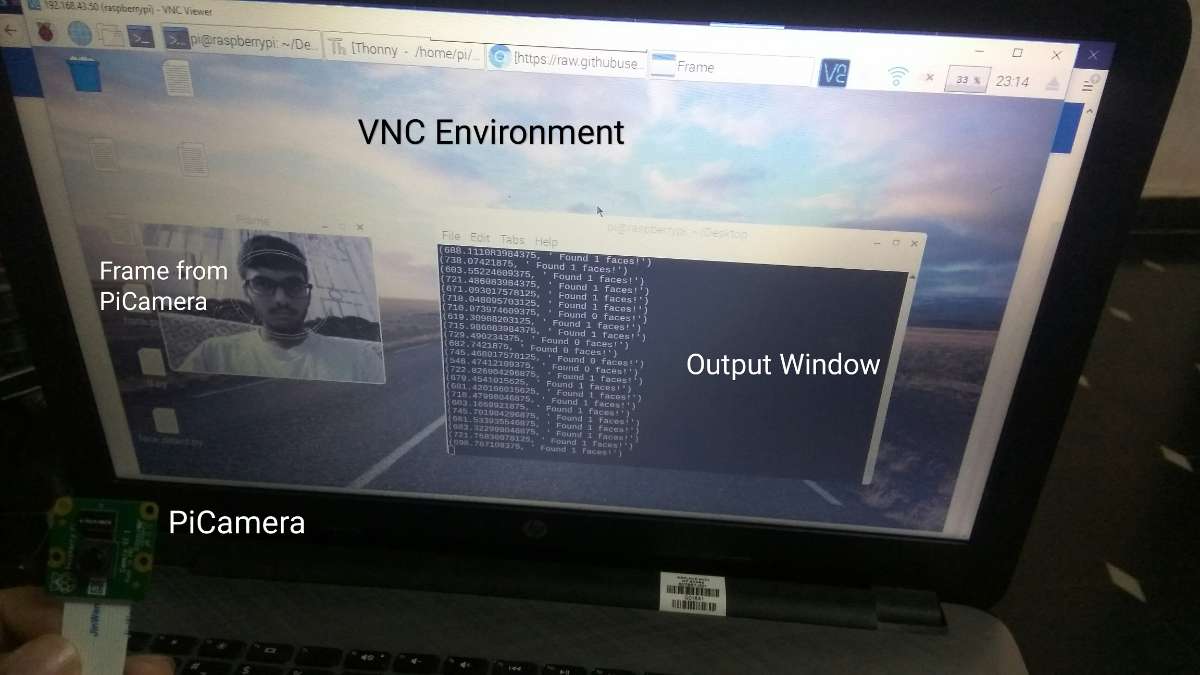
The face detection was successfully achieved using Haar Cascade, with face recognition obtained with about 70% accuracy. The face was detected with a circle white in colour encircling the face in the image given.

The messages sent from publisher were correctly incorporated by the client with the robot moving in desired direction, with a high accuracy. The MQTT connection was thus successfully established between the publishers, the broker and client with the messages being transmitted in real time.
Conclusion:
The purpose of this project was to create a Voice/Text Controlled Monitoring Robot with the capability of detecting and recognizing people. The objective was achieved using an Android Phone with a Voice to Text application which was used to command directions to the robot using an MQTT client application called MQTT Dash. The client then sent the commands to the server, using unique identifiers like username, password and port number. These identifiers which were pre-coded in the client side Python code were then used to detect and establish a MQTT connection between the publisher and client through the server. The commands were successfully received at the client side and the robot then moved in the direction according to the input command. Hence the robot was successfully controlled from a long distance.
To make surveillance possible, the camera and gas sensor values obtained by the robot were published using Flask, where any user could easily track the robot by logging in to the IP Address of the Raspberry Pi.
More information of the project can be found at the below site:
http://sersc.org/journals/index.php/IJAST/article/view/21218/10752