
Code GitHub Repo -> https://github.com/YashIndane/platefetcher
Story
I always wanted to make a cheap and handy device, which could just point to a number/license plate and it would get the relevant details about the vehicle. I thought it is possible to make such a device using a Raspberry Pi and some image processing. Such a device can be used by Traffic Police to quickly get details of a vehicle using just a scan of the number plate.
The device gives the following details of the vehicle -
- Vehicle full name
- Registration year
- Engine size
- Number of seats
- Vehicle ID
- Engine number
- Fuel type
- Registration date
- Location
Build
First for some efficient heat management, A bronze heat sink was attached to the top of the CPU unit, to dissipate heat in a distributed way. The CPU runs quite hot as the application is packaged in a container.
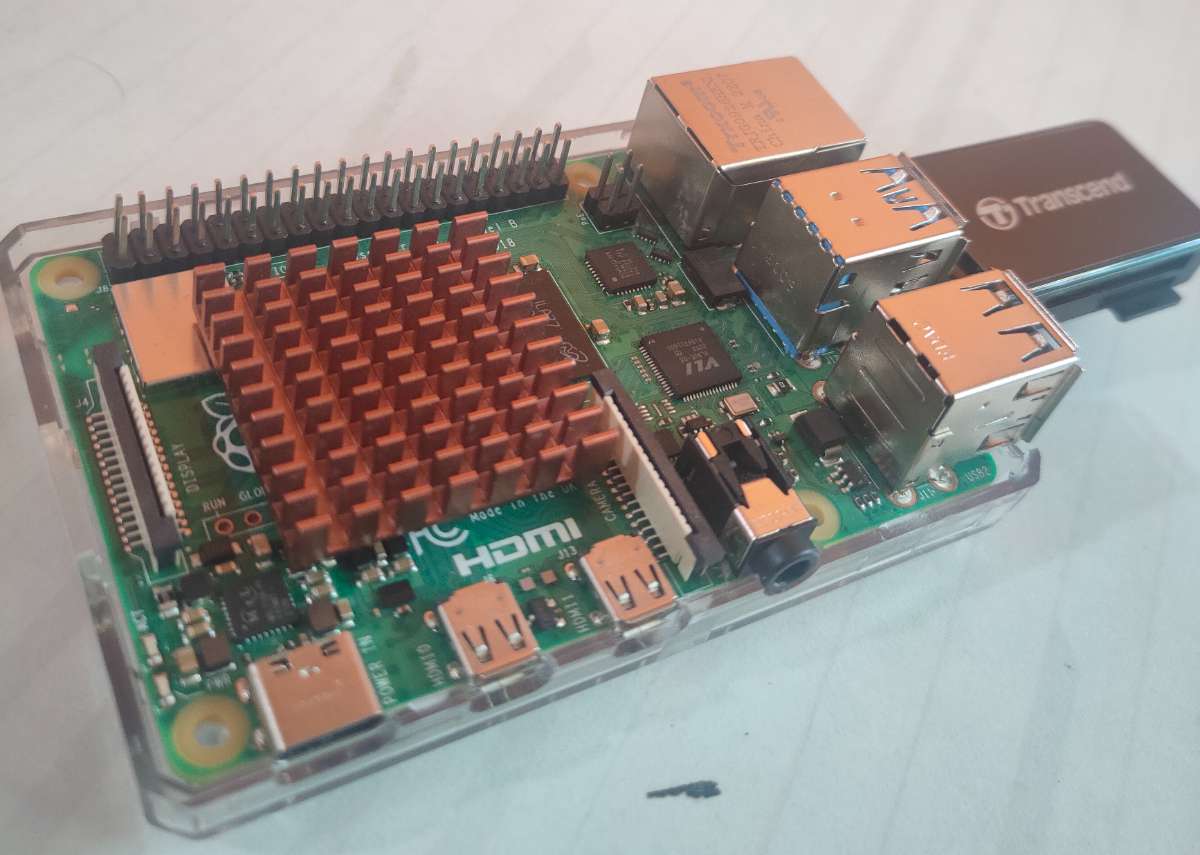
Now to effectively throw off the heated air in between heat sink spikes, a small cooling fan was installed on the heat sink.
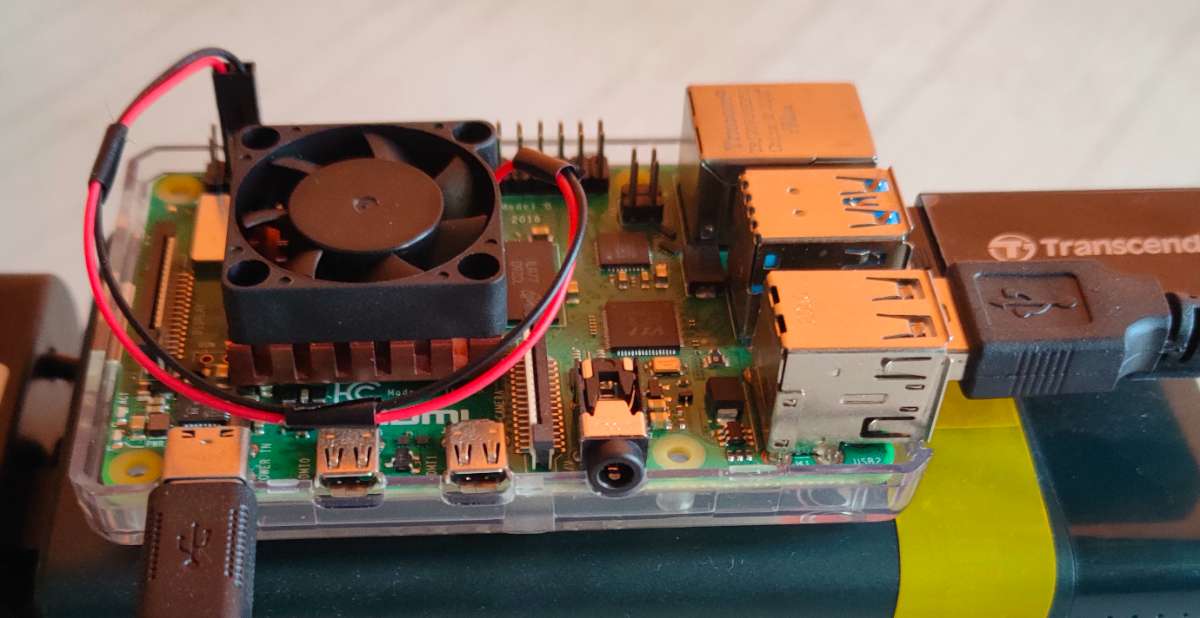
The build consists of using double sided adhesive tape to hold everything together. The Raspberry Pi which is enclosed in a plastic case helps it to get attached to the power bank & USB camera below it. The android phone is attached to top of the plastic case using similar approach.
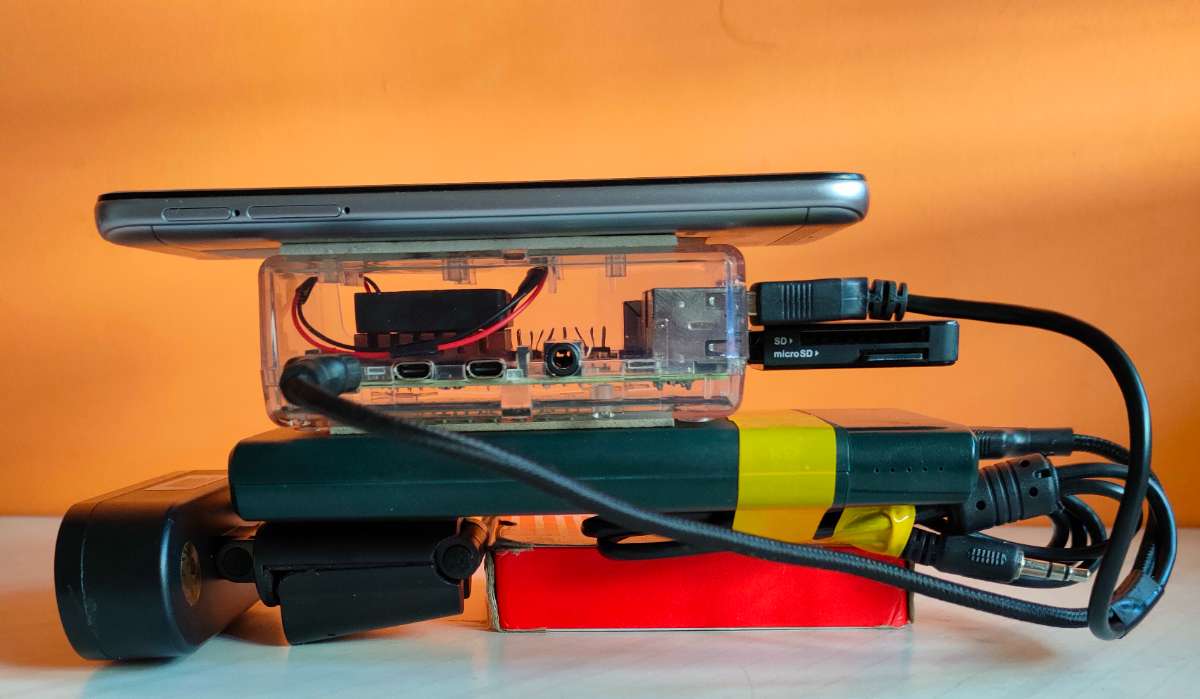
THE BUILD
Software Tools/Technologies
1. Python Language

Website -> https://www.python.org/
Python is a high-level, general-purpose programming language. In this project it was used to integrate the whole project software application.
Major Libraries used -
| Name | Use |
| cv2 | Used for image processing |
| json | Used to parse JSON response from API call |
| boto3 | Used to integrate with AWS Services and the Python Application |
| flask | Used to develop the Output response page |
| logging | Used to log the status of the Device |
2.AWS Textract Service

Website -> https://aws.amazon.com/textract/
AWS Textract service helps to detect text in images and extract it. This service can be integrated with any Python application using the boto3 library.
3.AWS S3 Service
Website -> https://aws.amazon.com/s3/?p=pm&c=s3&z=4
AWS S3 Service is object storage servie which stores various objects such as image, BLOB and PDF, etc files on the Cloud. This service can be integrated with any Python application using the boto3 library.
4.Docker

Website -> https://www.docker.com/
Docker is a platform that makes use of OS-level virtualization to provide a software application in containers.
Docker makes it easy to develop and ship application. It packages all the code and its dependencies together in single docker image.
Docker Hub Image link for this project -> https://hub.docker.com/repository/docker/yashindane/demoplate/general
5.AWS RDS Service (Optional)

Website -> https://aws.amazon.com/rds/
AWS RDS Service is a database service from AWS, where we can host our Databases. It gives plenty of options to choose from such as MySQL, MariaDB, Oracle DB etc. This is used in case want to save the details of the scans of the number plates.
6.Terraform (Optional)

Website -> https://www.terraform.io/
Terraform is an IAC tool (Infrastructure as Code). This is used to automatically configure services in the cloud. This can be used to configure the AWS RDS and S3 services just by running a Terraform script.
Working
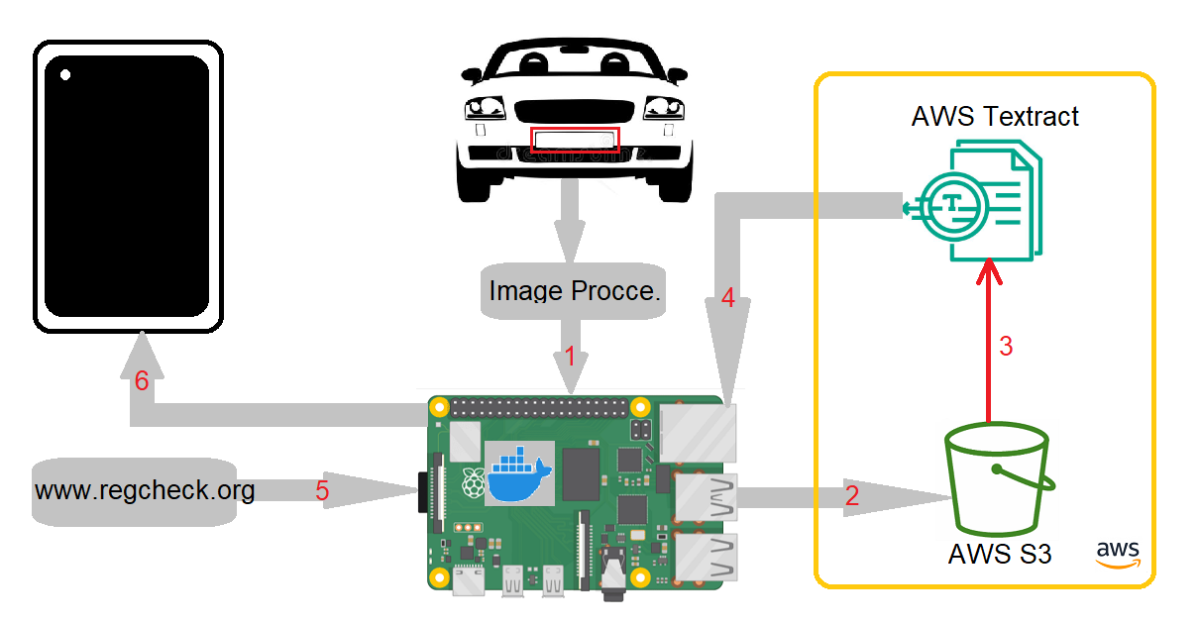
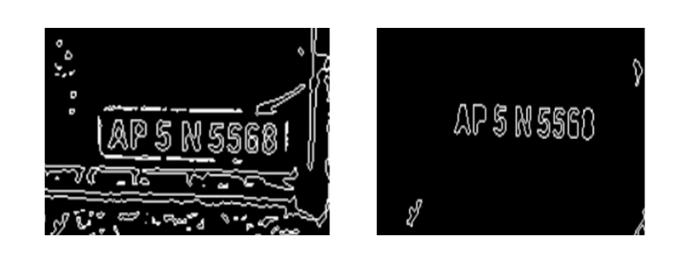
1. Image Processing - This step consists of capturing frames coming from the camera input and preprocessing them by converting the image format from RGB to HSV. After this the image is converted to its grayscale form.
Now we perform some Morphological transformations which are used to enhance bright objects which are having a dark colored background which is also called top-hat transformation. The opposite of it is called bottom-hat transformation. To enhance the output of transformation top-hat results were added and the bottom-hat results were subtracted.
The image can be noisy, so we apply Gaussian Smoothing to get rid of noisy elements in the image. In Mathematics we calculate the smoothing by 2-dimensional Gaussian function:

Here x, y are represent the vector distance between the origin and horizontal & vertical axis. We do this by using GaussianBlur function from opencv library.
Then we apply contours to get the plate region of interest and save it.
A sample of the code used for image processing from appaws.py -
    #RGB to HSV Conversion
    hsv = cv2.cvtColor(frame, cv2.COLOR_BGR2HSV)

    #Grayscale extraction, taking V-Channel
    (h,s,v) = cv2.split(hsv)

    #Morphological transformations
    tophat = cv2.morphologyEx(v, cv2.MORPH_TOPHAT, kernel=(5,5))
    blackhat = cv2.morphologyEx(v, cv2.MORPH_BLACKHAT, kernel=(5,5))
    cv2.add(v, tophat)
    cv2.subtract(v, blackhat)

    #Gaussian Smoothing
    gaussian_blur = cv2.GaussianBlur(v, (5, 5), 0)

    #Plate detection
    plate = plate_classifier.detectMultiScale(gaussian_blur, 1.43, 7)
    for (x, y, w, h) in plate:

        #The ratio for indian plates
        r=(y+h/x+w)
        if 400<r<450:
            detected_plate = frame[y:y+h, x:x+w]
            cv2.rectangle(frame, (x, y), (x + w, y + h), (205, 50, 153), 2)
            cv2.imwrite("static/detected_plate.png", detected_plate)
            text = extract_number_aws()
            logging.info(text)
            frame = cv2.putText(frame, text, (50, 50), cv2.FONT_HERSHEY_SIMPLEX,
                                1, (0,255,0), 2, cv2.LINE_AA)
2. Processed plate image is uploaded to AWS S3 - Once we get ROI plate, the image is uploaded to the public S3 bucket. Once the image is uploaded, AWS Textract service is used to get the characters from the plate image.
Sample of Code from appaws.py -
  #Putting image in S3
  region = DEFAULT_REGION
  bucket_name = BUCKET
  filename = "static/detected_plate.png"
  s3 = boto3.resource("s3")
  s3.Bucket(bucket_name).upload_file(filename, "detected_plate.png")
3. AWS Textract uses that image to extract the numbers - AWS Textract service gets the characters from plate image and returns it. Amazon Textract is a machine learning (ML) service that automatically extracts text, handwriting, layout elements, and data from scanned documents. It goes beyond simple optical character recognition (OCR) to identify, understand, and extract specific data from documents.
Sample of Code from appaws.py -
#Calling Textract, to extract characters
  textract = boto3.client("textract", region_name=region)
  response = textract.detect_document_text(
      Document = {
        "S3Object" : {
          "Bucket" : bucket_name,
          "Name" : "detected_plate.png"
         }
     }
  )
4. Raspberry Pi receives the extracted numbers - Once AWS Textract responds with the characters, the RPI receives it and processes it, to be send to a request to regcheck.org.
5. Fetching vehicle details using API - The RPI then using python requests library, reaches the http://www.regcheck.org site to get the details and process it using JSON library. This site responds the vehicle details in a JSON format.
Sample of Code from appaws.py -
number = request.args.get("vnumber")
req = requests.get(f"http://www.regcheck.org.uk/api/reg.asmx/CheckIndia?RegistrationNumber={number}&username={REG_CHECK_USER}")
data = xmltodict.parse(req.content)
jdata = json.dumps(data)
df = json.loads(jdata)
df1 = json.loads(df["Vehicle"]["vehicleJson"])
6. Rendering the details on the webpage - The fetched details are then rendered on the webpage using JavaScript which is hosted on Python based flask server in a Docker container.
Usage
All the code is packed inside a docker container, and we need to run the container.
Start the container using -
$ sudo docker run --platform linux/arm64/v8 -dit -p <PORT>:2400 --device /dev/video0 --name <NAME> \
  docker.io/yashindane/demoplate:12 --aak="<AWS_ACCESS_KEY>" --ask="<AWS_SECRET_KEY>" \
  --region="<DEFAULT_REGION>" --bucketname="<BUCKET_NAME>" --user="<REG_CHECK_USER>"
There are some optional arguments used in case DB is needed to store the extracted plate values -
Optional arguments -
| Argument | Description |
|---|---|
| --dbhost | Host endpoint of DB instance (String) |
| --dbport | Port at which DB service running (String) |
| --dbuser | DB username (String) |
| --dbpass | DB password min 8 characters (String) |
Once the docker container starts, Just open chrome browser on phone and navigate to this URL -> http://<RASPBERRY-PI-IP>:PORT/out. Now just point the camera to a license plate and it will fetch the details of the vehicle and display it on the browser like this ->
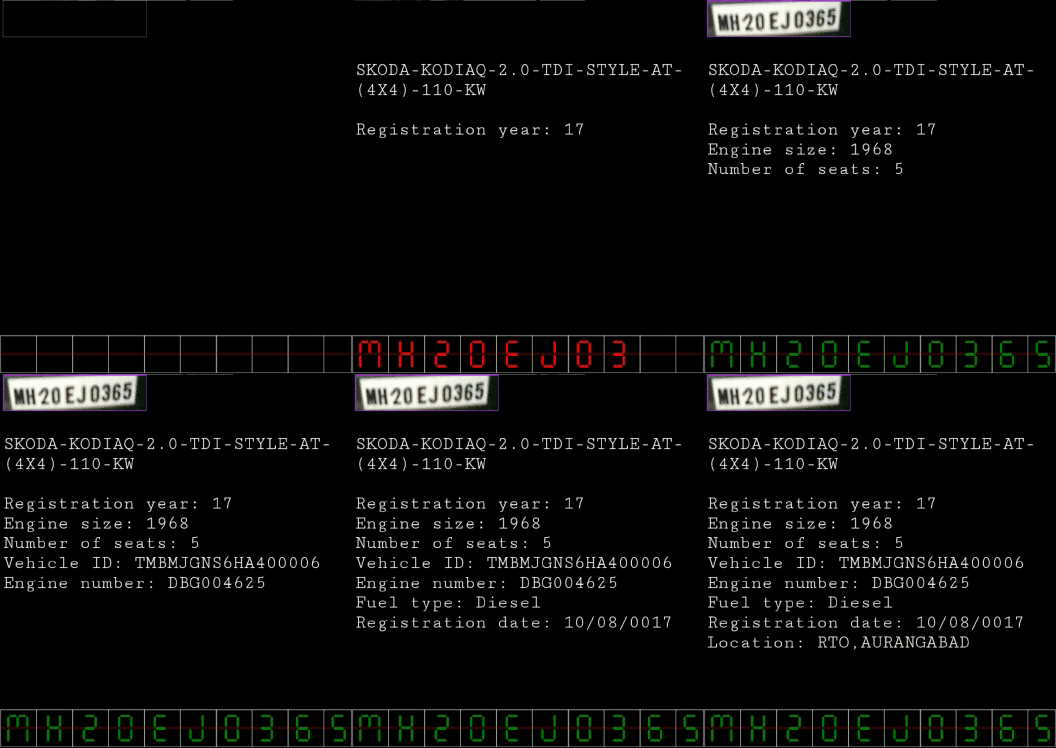
Note - Just refresh the page to scan other license plate.
In case DB was used to store the plate data, it looks like this, when checked from MySQL client ->

Prerequisites
1.Installing docker
$ sudo curl -fsSL https://get.docker.com -o docker-install.sh
$ sh docker-install.sh
$ sudo usermod -aG docker pi
$ sudo reboot
2.(optional) Installing podman
$ sudo apt-get -y install podman
3.(optional) Installing terraform
$ sudo wget https://releases.hashicorp.com/terraform/1.3.7/terraform_1.3.7_linux_arm64.zip
$ sudo unzip <ZIPFILE>
$ sudo mv terraform /usr/bin/
4. Create a publicly accessible bucket with the IAM user in AWS. The user must have Power User and Admin User access.
Configure this bucket policy-
{
  "Id": "Policy1664186300628",
  "Version": "2012-10-17",
  "Statement": [
    {
      "Sid": "Stmt1664186298804",
      "Action": "s3:*",
      "Effect": "Allow",
      "Resource": "arn:aws:s3:::<BUCKET-NAME>/*",
      "Principal": "*"
    }
  ]
}
Create a account on http://www.regcheck.org.uk and pass that username with --user=.
(optional) Creating a MySQL DB instance for all plate details to store in.
(optional) Creating the DB and S3 bucket using terraform
(optional) Navigate to infra-provisioning directory and run below to create DB instance and S3 bucket -
$ sudo terraform init
$ sudo terraform validate
$ sudo terraform plan
$ sudo terraform apply -var="access_key=<AWS_ACCESS_KEY>" -var="secret_key=<AWS_SECRET_KEY>" -var="bucket_name=<S3_BUCKET_NAME>" \
  -var="identifier=<DB_IDENTIFIER>" -var="db_username=<DB_USERNAME>" -var="db_pass=<DB_PASSWORD>" -auto-approve
Applications
This device can be used as a cheap solution to fetch the details of any vehicle with just a scan of the license plate remotely. It also has storage capabilities if it's used with a database hosted on AWS. In the database one can find all the details fetched of the respective scans.
The device fetches latest details of the vehicle and so it can be used to get all the details like engine no, vehicle number etc. It can be a handy device in case of lost/found situation with a vehicle.
Future Developments
1.Changing from browser based display approach to a dedicated LCD display to reduce weight of the device along with charging of the android device overhead.
2.Using better Image processing techniques like YOLO to get a faster region of interest detection.
3.Doing character recognition using edge computing to reduce latency when using AWS services to do it.
Conclusion
The device is capable of fetching vehicle details in real time and can be used in traffic related operations.
Thank You!