Introduction
MQTT is a lightweight publish-subscribe-based messaging protocol.
- It is quicker (faster) than other request-response based APIs like HTTP.
- It is developed on the base of the TCP/IP protocol.
- It allows remote location devices to connect, subscribe, publish, etc. to a specific topic on the server with the help of a message broker.
- MQTT Broker/Message broker is a module in between the sender and the receiver. It is an element for message validation, transformation, and routing.
- The broker is responsible for distributing messages to the interested clients (subscribed clients) of their interested topic.
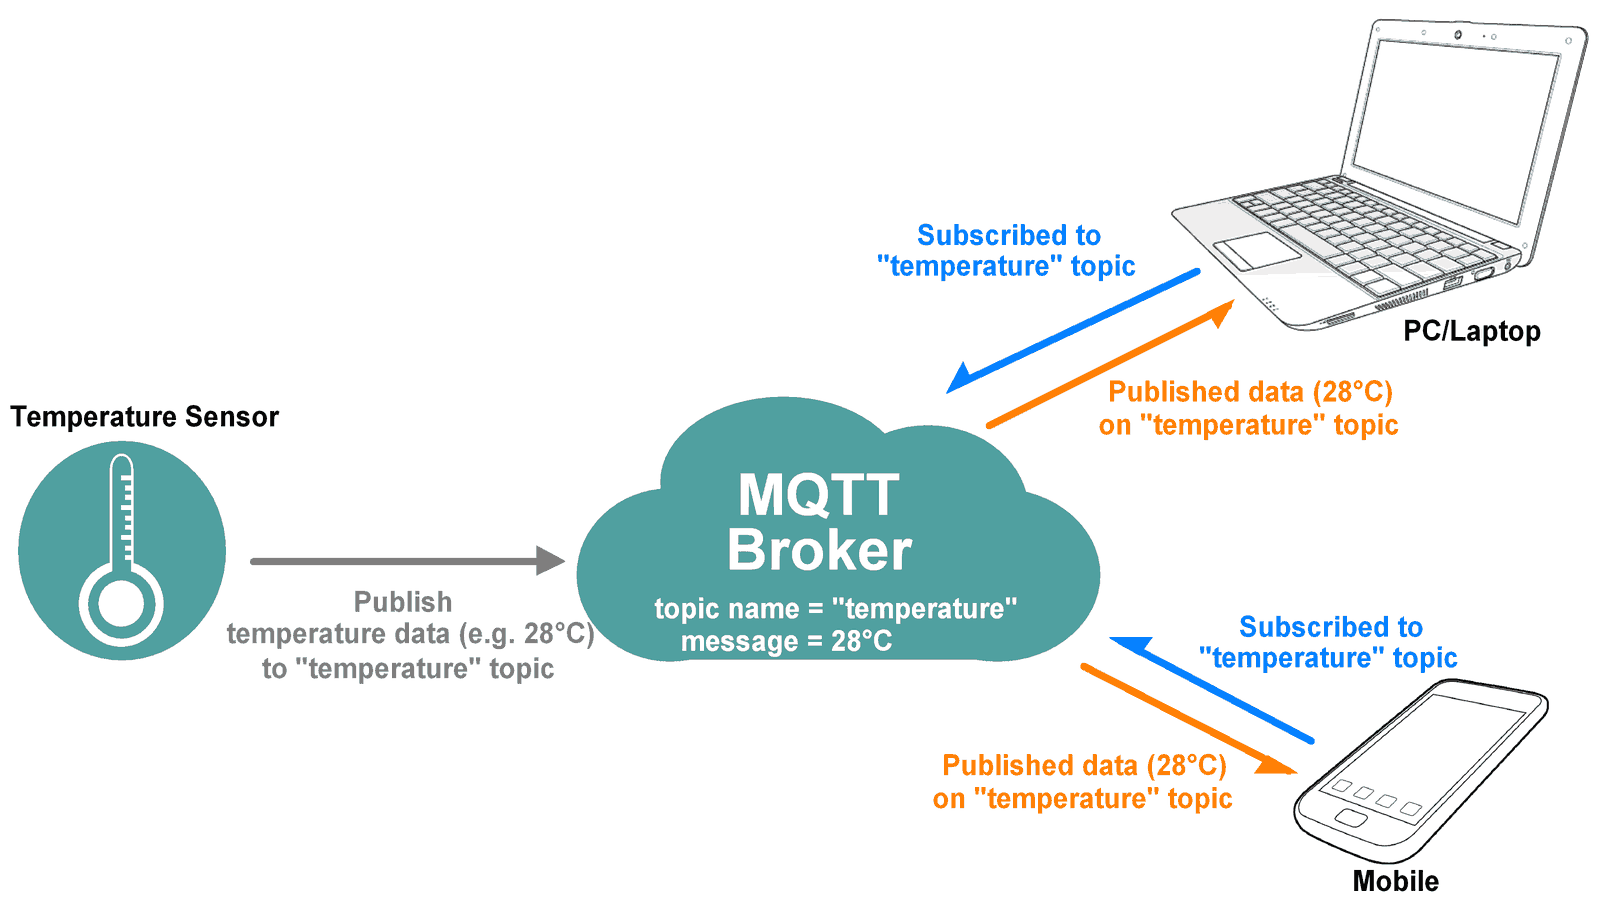
For example, if the temperature sensor publishes the temperature data (message) on the topic “temperature” then interested clients who have subscribed to the “temperature” topic get that published temperature data as shown in the above figure.
MQTT is widely used in IoT (Internet of Things) embedded applications, where every sensor is connected to a server and we have access to control them over the internet.
NodeMCU is an open-source IoT platform. It is a firmware which runs on ESP8266 Wi-Fi SoC from Espressif Systems. It has onboard wi-fi available through which IoT applications become easy to build.
The MQTT Client module of NodeMCU is according to version 3.1.1 of the MQTT protocol. Make sure that your broker supports and is correctly configured for version 3.1.1. let’s see the functions used for MQTT on NodeMCU.
MQTT Packet Formation
MQTT uses many packet formats that used to connect to the server and subscribe or publish to the topic on the server.
Refer below link for MQTT OASIS standard. It will help to understand MQTT packet formations.
http://docs.oasis-open.org/mqtt/mqtt/v3.1.1/os/mqtt-v3.1.1-os.html#_Toc398718027
Example
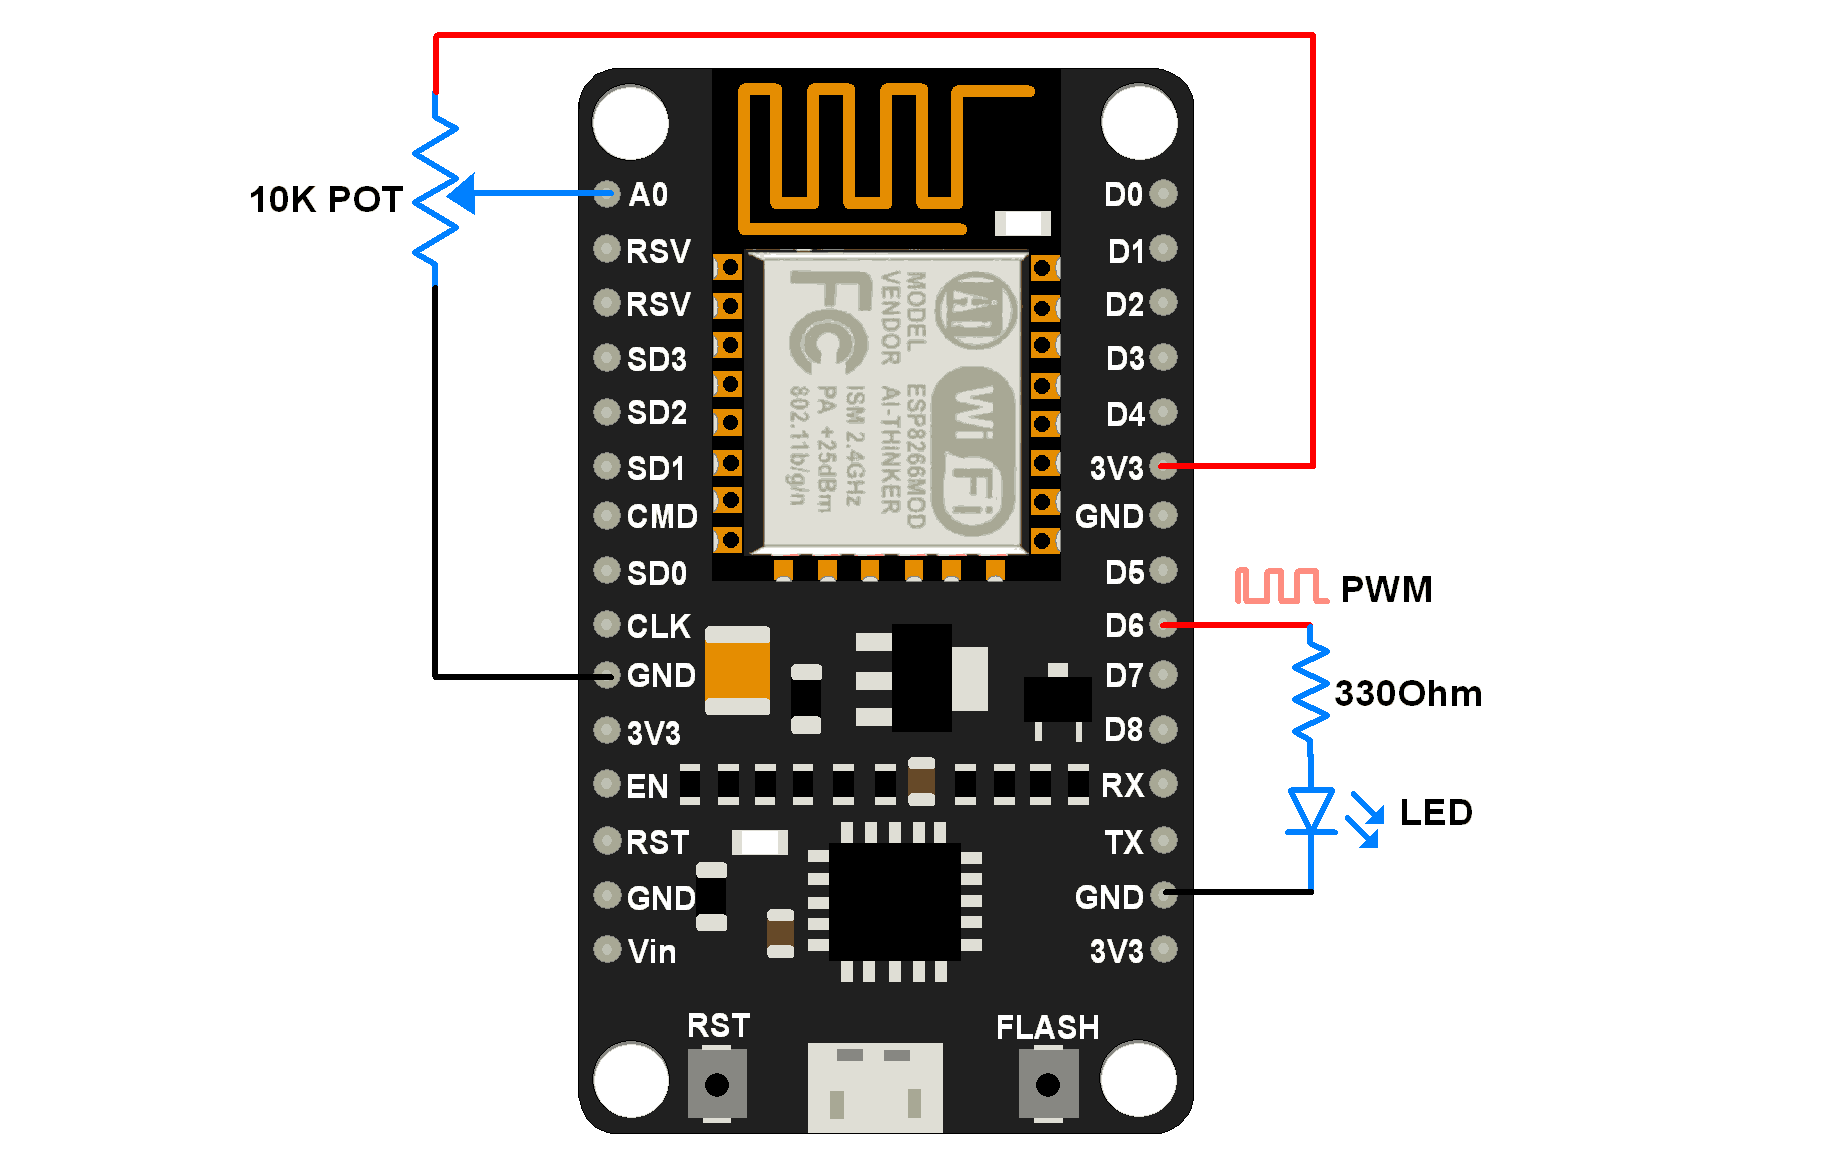
Let’s write an Arduino program to configure NodeMCU as MQTT Client to
- Control LED brightness from remote location and
- Sending voltage across POT(Potentiometer) in digital form to remote location from the Adafruit dashboard.
Here we are using the Adafruit server for MQTT Client demo purpose.
In the IOT platform, Adafruit IO Dashboard allows us to visualize and provides control over the connected devices to the internet. Anyone can visualize and analyze live data from their sensor devices. To learn more and start with Adafruit IO Dashboard refer link https://learn.adafruit.com/adafruit-io-basics-dashboards/creating-a-dashboard
Just sign up and create a dashboard. After the successful creating of the dashboard, we will get the AIO key which is later used to access feed data.
Once we created a dashboard on Adafruit we can add various blocks that can be used to control devices as well as monitor the status of devices. To see more about blocks, refer link https://learn.adafruit.com/adafruit-io-basics-dashboards/adding-blocks
Install required libraries
First, refer to Getting Started with NodeMCU using Arduino IDE if you are not installed NodeMCU board packages in Arduino IDE.
Here we are using Adafruit libraries for the above example. We will need to install the Adafruit IO, Adafruit MQTT, and ArduinoHttpClient libraries using the Arduino Library Manager.
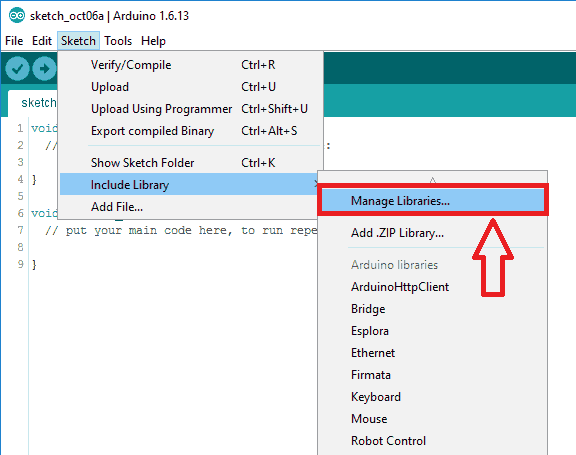
Open the Arduino IDE and navigate to Sketch -> Include Library -> Manage Libraries…
The library Manager window will pop up. Now enter Adafruit IO Arduino into the search box, and click Install on the Adafruit IO Arduino library option to install version 2.6.0 or higher.
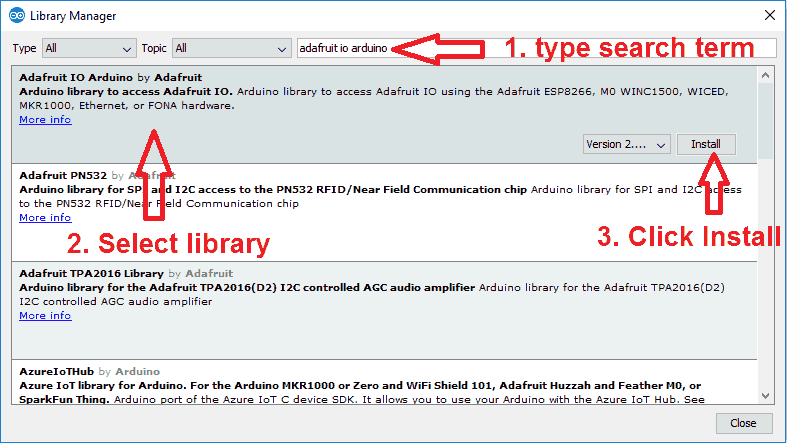
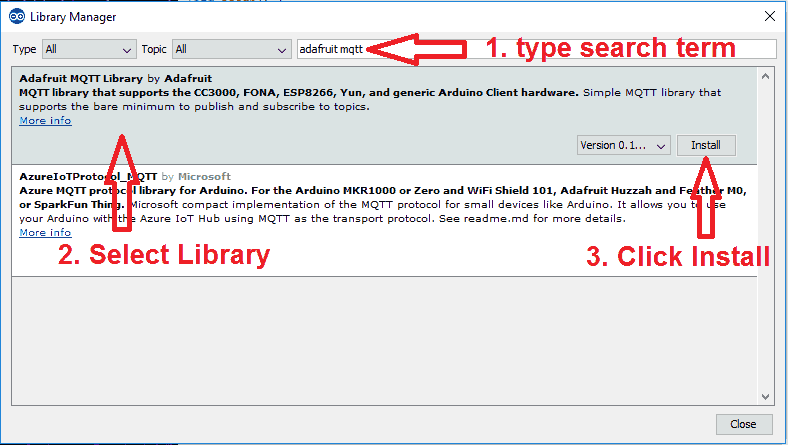
Now enter Adafruit MQTT into the search box, and click Install on the Adafruit MQTT library option to install version 0.17.0 or higher.
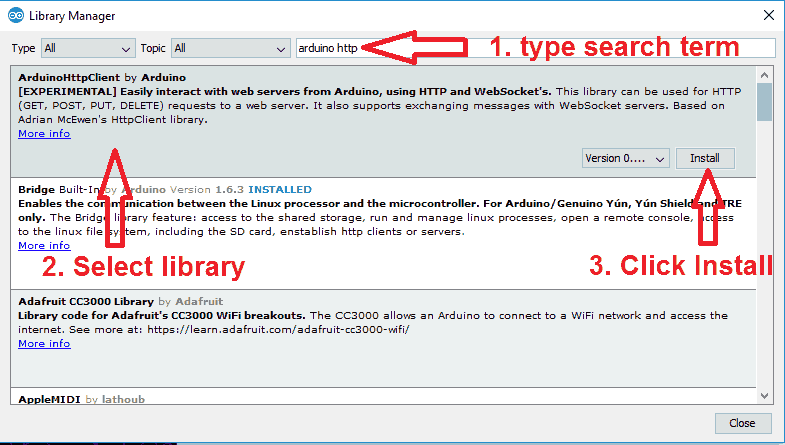
Now enter Arduino Http Client into the search box, and click Install on the ArduinoHttpClient library option to install version 0.3.0 or higher.
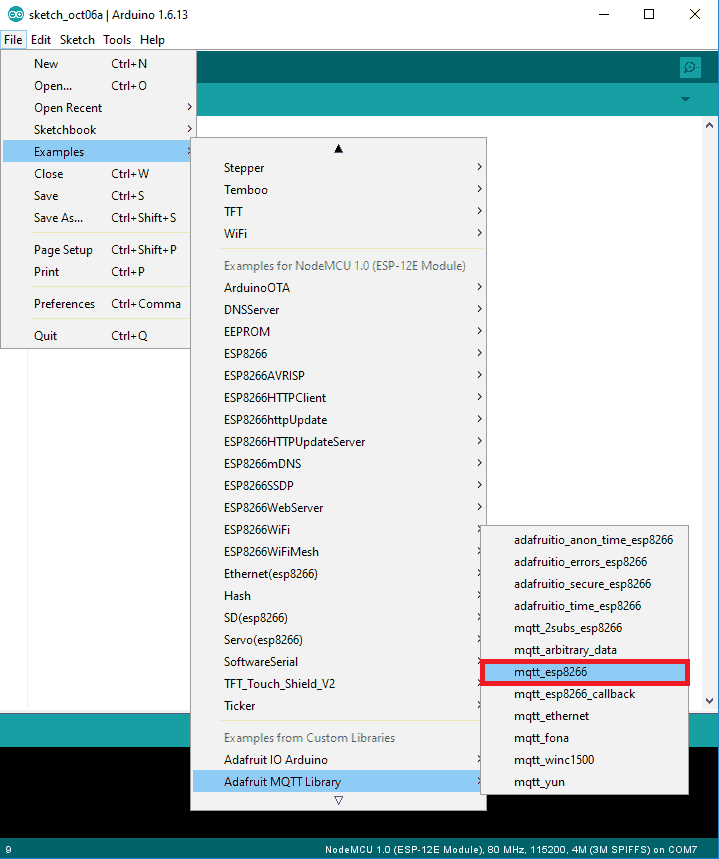
Now open example of Adafruit mqtt io dashboard. To open it navigate to File -> Examples -> Adafruit MQTT Library -> mqtt_esp8266
Now edit the wifi and Adafruit io credentials with correct information of example as shown in below image.
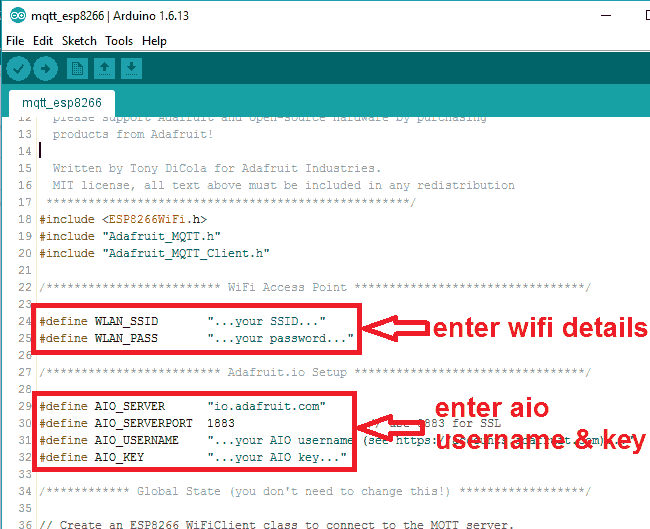
We have modified the mqtt_esp8266 example as per our above example as below
Arduino Sketch for NodeMCU MQTT Client
/***************************************************
  Adafruit MQTT Library ESP8266 Example

  Must use ESP8266 Arduino from:
    https://github.com/esp8266/Arduino

  Works great with Adafruit's Huzzah ESP board & Feather
  ----> https://www.adafruit.com/product/2471
  ----> https://www.adafruit.com/products/2821

  Adafruit invests time and resources providing this open source code,
  please support Adafruit and open-source hardware by purchasing
  products from Adafruit!

  Written by Tony DiCola for Adafruit Industries.
  MIT license, all text above must be included in any redistribution
 ****************************************************/
#include <ESP8266WiFi.h>
#include "Adafruit_MQTT.h"
#include "Adafruit_MQTT_Client.h"

/************************* WiFi Access Point *********************************/

#define WLAN_SSID       "...your SSID..."
#define WLAN_PASS       "...your password..."

/************************* Adafruit.io Setup *********************************/

#define AIO_SERVER      "io.adafruit.com"
#define AIO_SERVERPORT  1883                   // use 8883 for SSL
#define AIO_USERNAME    "...your AIO username (see https://accounts.adafruit.com)..."
#define AIO_KEY         "...your AIO key..."

/************ Global State (you don't need to change this!) ******************/

// Create an ESP8266 WiFiClient class to connect to the MQTT server.
WiFiClient client;
// or... use WiFiFlientSecure for SSL
//WiFiClientSecure client;

// Setup the MQTT client class by passing in the WiFi client and MQTT server and login details.
Adafruit_MQTT_Client mqtt(&client, AIO_SERVER, AIO_SERVERPORT, AIO_USERNAME, AIO_KEY);

/****************************** Feeds ***************************************/

// Setup a feed called 'potValue' for publishing.
// Notice MQTT paths for AIO follow the form: <username>/feeds/<feedname>
Adafruit_MQTT_Publish potValue = Adafruit_MQTT_Publish(&mqtt, AIO_USERNAME "/feeds/potValue");

// Setup a feed called 'ledBrightness' for subscribing to changes.
Adafruit_MQTT_Subscribe ledBrightness = Adafruit_MQTT_Subscribe(&mqtt, AIO_USERNAME "/feeds/ledBrightness");

/*************************** Sketch Code ************************************/

// Bug workaround for Arduino 1.6.6, it seems to need a function declaration
// for some reason (only affects ESP8266, likely an arduino-builder bug).
void MQTT_connect();

uint8_t ledPin = D6;
uint16_t potAdcValue = 0;
uint16_t ledBrightValue = 0;

void setup() {
  Serial.begin(9600);
  delay(10);

  Serial.println(F("Adafruit MQTT demo"));

  // Connect to WiFi access point.
  Serial.println(); Serial.println();
  Serial.print("Connecting to ");
  Serial.println(WLAN_SSID);

  WiFi.begin(WLAN_SSID, WLAN_PASS);
  while (WiFi.status() != WL_CONNECTED) {
    delay(500);
    Serial.print(".");
  }
  Serial.println();

  Serial.println("WiFi connected");
  Serial.println("IP address: "); Serial.println(WiFi.localIP());

  // Setup MQTT subscription for ledBrightness feed.
  mqtt.subscribe(&ledBrightness);
}

void loop() {
  // Ensure the connection to the MQTT server is alive (this will make the first
  // connection and automatically reconnect when disconnected).  See the MQTT_connect
  // function definition further below.
  MQTT_connect();

  // this is our 'wait for incoming subscription packets' busy subloop
  // try to spend your time here

  Adafruit_MQTT_Subscribe *subscription;
  while ((subscription = mqtt.readSubscription(200))) {
    if (subscription == &ledBrightness) {
      Serial.print(F("Got LED Brightness : "));
      ledBrightValue = atoi((char *)ledBrightness.lastread);
      Serial.println(ledBrightValue);
      analogWrite(ledPin, ledBrightValue);
    }
  }

  // Now we can publish stuff!
  uint16_t AdcValue = analogRead(A0);
  if((AdcValue > (potAdcValue + 7)) || (AdcValue < (potAdcValue - 7))){
    potAdcValue = AdcValue;
    Serial.print(F("Sending pot val "));
    Serial.print(potAdcValue);
    Serial.print("...");
    if (! potValue.publish(potAdcValue)) {
      Serial.println(F("Failed"));
    } else {
      Serial.println(F("OK!"));
    }
  }
  // ping the server to keep the mqtt connection alive
  // NOT required if you are publishing once every KEEPALIVE seconds
  /*
  if(! mqtt.ping()) {
    mqtt.disconnect();
  }
  */
}

// Function to connect and reconnect as necessary to the MQTT server.
// Should be called in the loop function and it will take care if connecting.
void MQTT_connect() {
  int8_t ret;

  // Stop if already connected.
  if (mqtt.connected()) {
    return;
  }

  Serial.print("Connecting to MQTT... ");

  uint8_t retries = 3;
  while ((ret = mqtt.connect()) != 0) { // connect will return 0 for connected
       Serial.println(mqtt.connectErrorString(ret));
       Serial.println("Retrying MQTT connection in 5 seconds...");
       mqtt.disconnect();
       delay(5000);  // wait 5 seconds
       retries--;
       if (retries == 0) {
         // basically die and wait for WDT to reset me
         while (1);
       }
  }
  Serial.println("MQTT Connected!");
}
Video
Components Used |
||
|---|---|---|
| NodeMCU NodeMCUNodeMCU |
X 1 | |
| ESP12F ESP12E |
X 1 | |
Downloads |
||
|---|---|---|
|
|
NodeMCU MQTT Client | Download |