Introduction
- An automatic watering system for a garden is used for automating the process of watering the garden. It makes sure that the garden is watered regularly and the plants get sufficient amount of water required for their optimal growth.
- Many a time, we forget to water our gardens and the plants suffer as a result. This system ensures that such instances are avoided and the plants don’t suffer due to our negligence.
- We can add internet connectivity to the system to create an IoT based system and monitor the environment of our garden remotely, especially when we are away from home for a number of days.
- Using Microsoft Azure Web App service, we can monitor the data received from the garden on the Azure cloud.
Here, we will create an IoT based application for automatic watering and environment monitoring of garden using Microsoft Azure services.
- In this application, we will collect the ambient temperature and relative humidity data of the garden using a DHT11 sensor and send it to an Azure IoT Hub. We will also collect soil moisture data using a soil moisture sensor and send it to the Azure IoT Hub. The IoT Hub will send the data to a Web App, where the temperature, humidity, and moisture data will be displayed on graphs. The Web App can be accessed by any person who has the URL for the Web App.
- If the soil moisture drops below a defined value, a pump is turned on to water the garden. The pump status (On or Off) is also shown on the website.
- If temperature and humidity of the garden goes beyond predefined values, temperature and moisture alerts are also displayed on the website (True or False).
For this application, we will need the following:
1. A NodeMCU which can send data to an IoT Hub.
The code for the NodeMCU device is available in Source Code section at the end of this page.
Details about the code and how to set up the device are covered below in the later sections.
2. A DHT11 sensor that will provide us with the temperature and relative humidity data.
Refer DHT11 sensor in the Sensors and Modules section for information about the DHT11 sensor.
Refer DHT11 Sensor Interfacing with NodeMCU in the NodeMCU interfaces section to know how DHT11 sensor is interfaced with a NodeMCU.
A soil moisture sensor that will provide us with the soil moisture data in the garden.
Refer soil moisture sensor in the Sensors and Modules section for information about soil moisture sensor.
Refer Soil Moisture Sensor Interfacing with NodeMCU in the NodeMCU interfaces section to know how soil moisture sensor is interfaced with a NodeMCU.
3. A Microsoft Azure account.
Refer Microsoft Azure Free Account Sign-Up in the Getting Started section of Microsoft Azure to create your free Microsoft Azure account if you do not already have one.
4. A Web App on Microsoft Azure that will be used for displaying data (temperature, humidity, moisture, pump status, temperature alert and moisture alert).
The code for the Web App is provided in the Source Code section at the end of this page.
How to use this Web App and how to deploy it on Microsoft Azure is covered below in the later sections.
Let’s begin with the automatic watering and environment monitoring system for the garden.
Automatic Watering and Environment Monitoring
The automatic watering system we are designing for gardens uses a soil moisture sensor interfaced with a NodeMCU. A DHT11 sensor is also interfaced with the NodeMCU for monitoring the environment (temperature and humidity) of the garden.
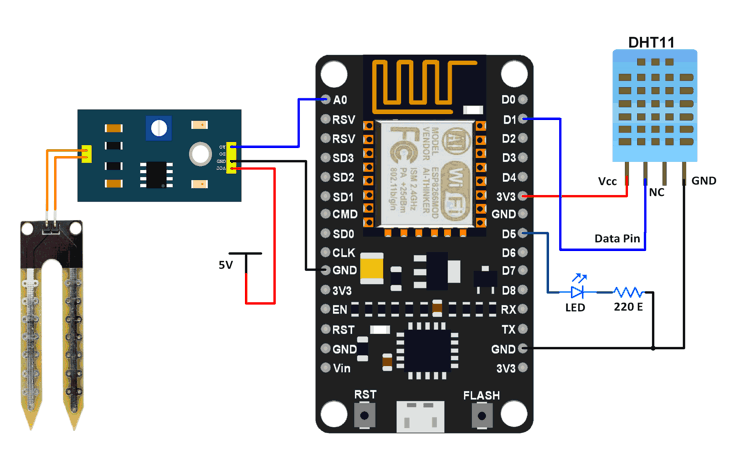
Interfacing Diagram for the Application
When the soil moisture drops below a defined value, a water pump is turned on to water the garden.
Here we have shown the pump turning on or off by an LED. You can drive a motor from the signal we are giving to the LED by using a driving mechanism (ex. turn on a relay using this signal in-turn to start the pump).
The temperature and humidity data collected by the DHT11 sensor is used for monitoring the garden environment.
This data is sent along with a temperature and moisture alert to an Azure IoT Hub.
Refer Sending DHT11 sensor data to IoT Hub using NodeMCU in the Getting Started section of Microsoft Azure to know how to send data to an IoT Hub. The basic steps covered in this document are necessary before you proceed further. Once you have set up the Arduino IDE for NodeMCU board, have installed the libraries mentioned in the document whose link is given above, you can proceed further.
The code we will be using is available in the Source Code section at the end of this page.
Upload the code using the Arduino IDE to your NodeMCU device.
The code is a modification of the Sample application by Azure.
The code snippet for the automatic watering used in the code is given below.
bool readMessage(int messageId, char *payload)
{
    float temperature = readTemperature();
    float humidity = readHumidity();
    float moisture = readMoisture();
    StaticJsonBuffer<MESSAGE_MAX_LEN> jsonBuffer;
    JsonObject &root = jsonBuffer.createObject();
    root["deviceId"] = DEVICE_ID;
    root["messageId"] = messageId;
    bool temperatureAlert = false;
    bool moistureAlert = false;

    // NAN is not the valid json, change it to NULL
    if (std::isnan(temperature))
    {
        root["temperature"] = NULL;
    }
    else
    {
        root["temperature"] = temperature;
        if (temperature > TEMPERATURE_ALERT)
        {
            temperatureAlert = true;
        }
    }

    if (std::isnan(humidity))
    {
        root["humidity"] = NULL;
    }
    else
    {
        root["humidity"] = humidity;
    }

    root["moisture"] = moisture;
    if (moisture < MOISTURE_ALERT)
    {
        moistureAlert = true;
        pump_turn_on = true;
        digitalWrite(pump_ctrl_pin, LOW);
    }
    else
    {
        pump_turn_on = false;
        digitalWrite(pump_ctrl_pin, HIGH);
    }

    root["pumpStatus"] = pump_turn_on;

    root["tempAlert"] = temperatureAlert;

    root["moistAlert"] = moistureAlert;

    root.printTo(payload, MESSAGE_MAX_LEN);
    return moistureAlert;
}
Now that our system is set up and is ready to send data to an IoT Hub, let’s set up the Microsoft Azure account to handle this data and process it according to our requirements.
You will have already set up your IoT Hub by now. If you have not, refer Creating an IoT Hub in Microsoft Azure in the Getting Started section of Microsoft Azure.
Now we need to create a Web App for our application.
The Web App will host our web application which will display the temperature, humidity, and moisture data in graph form. It will also display the pump status, temperature alert, and moisture alert.
Web App
Refer Using Web Apps to visualize real time data from IoT Hub in the Getting Started section of Microsoft Azure.
Once you have created the Web App, you are ready to upload the web application to be hosted by the Web App. Follow the steps for uploading the web application as mentioned in the document.
There is only one thing you need to keep in mind, instead of downloading the web application from GitHub, download the application from the Source Code sections at the end of this document. Then upload this web application using the method mentioned in the document.
The web application will look as shown below.
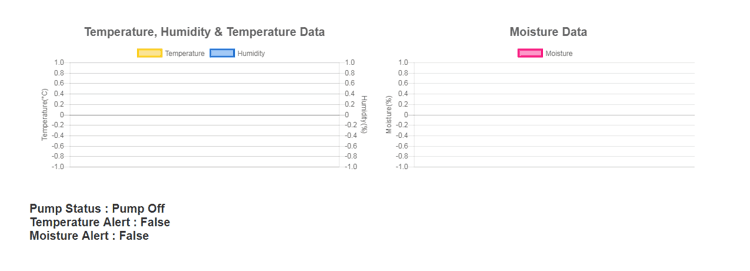
Our application is now set up and ready to be tested. Power the NodeMCU and connect the DHT11 and soil moisture sensors as shown in the interfacing diagram given earlier. Also, connect the LED (you can also connect a pump using a driver in between) as shown. Open the web application, you will see the graph getting updated after every few seconds, and the status of pump and temperature and moisture alerts changing as well.
Components Used |
||
|---|---|---|
| Soil Moisture Sensor Soil moisture sensor is used to measure the water content (moisture) in soil. It is used in agriculture applications, irrigation and gardening systems, etc. |
X 1 | |
| NodeMCU NodeMCUNodeMCU |
X 1 | |
| DHT11 DHT11 is a single wire digital humidity and temperature sensor, which gives relative humidity in percentage and temperature in degree Celsius. |
X 1 | |
| LED 5mm LED 5mm |
X 1 | |